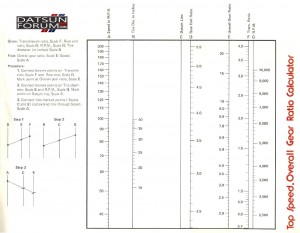
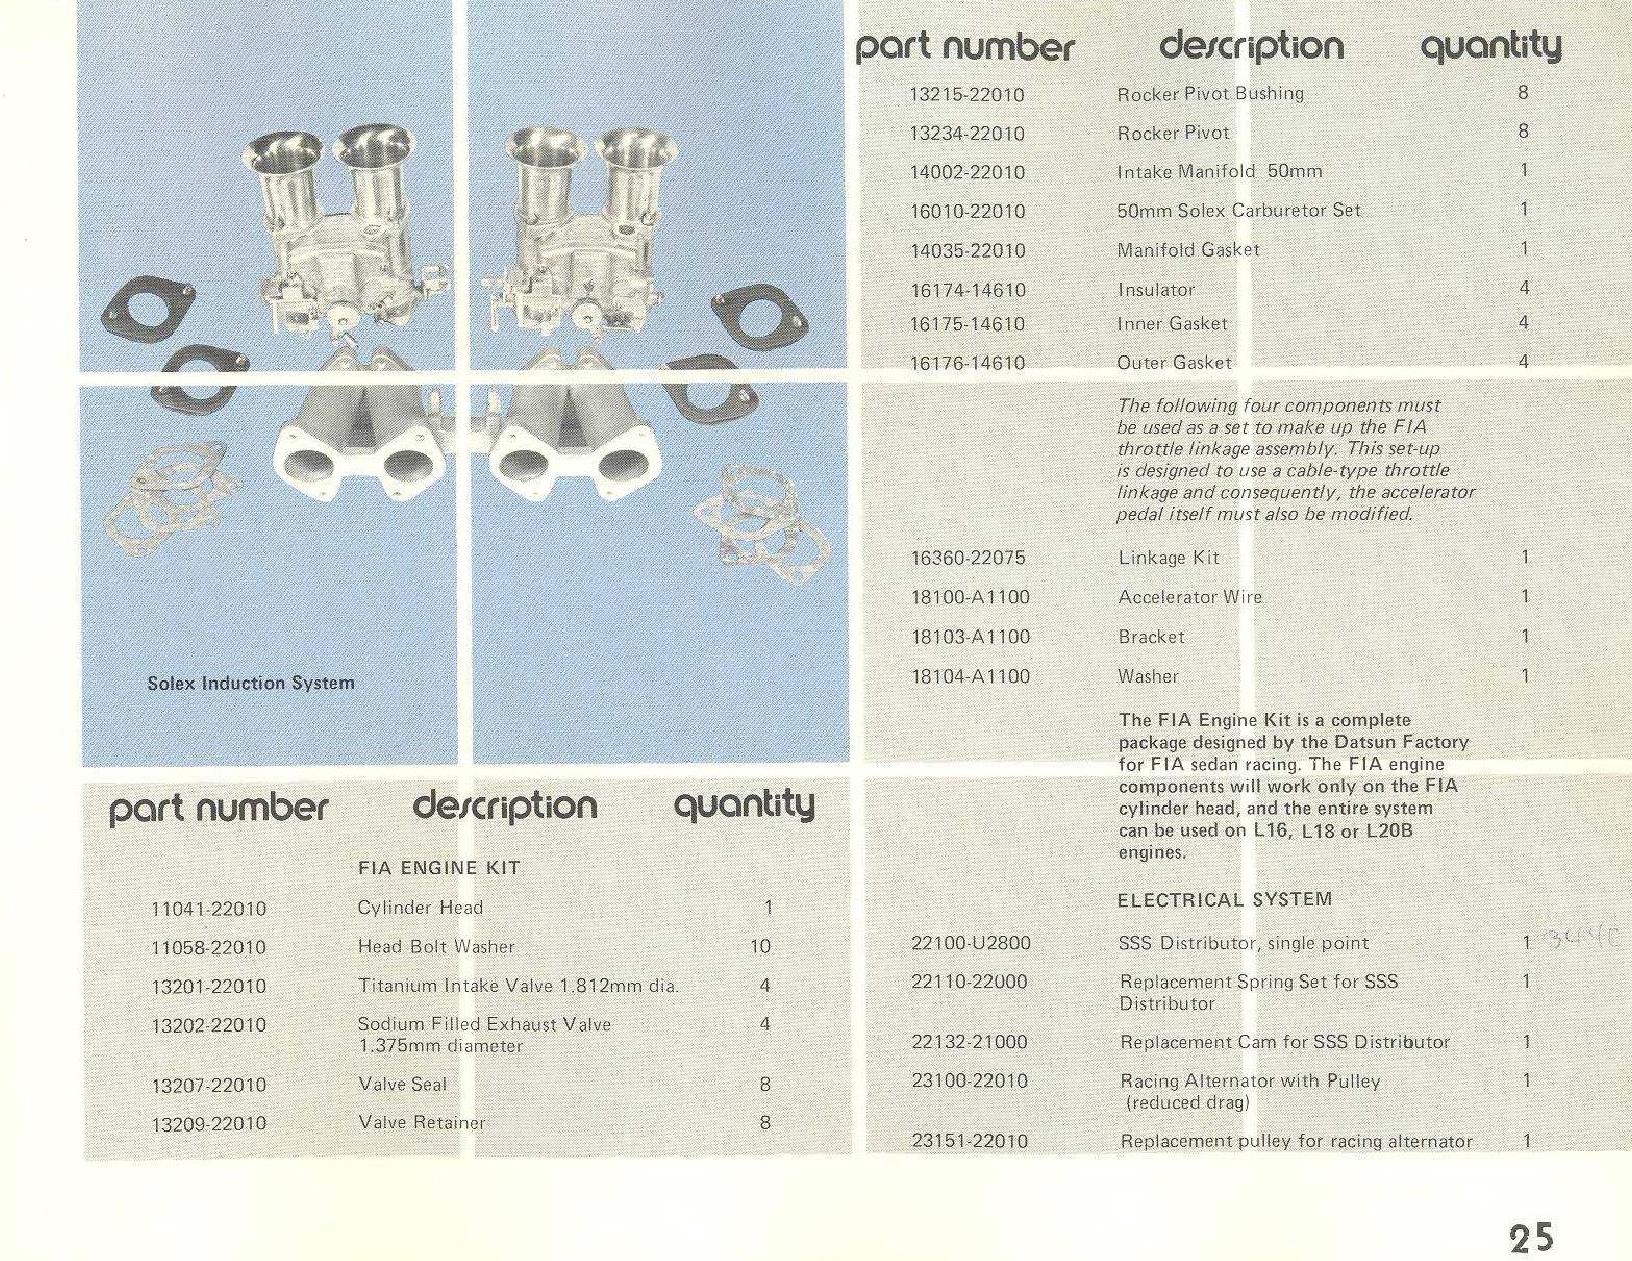
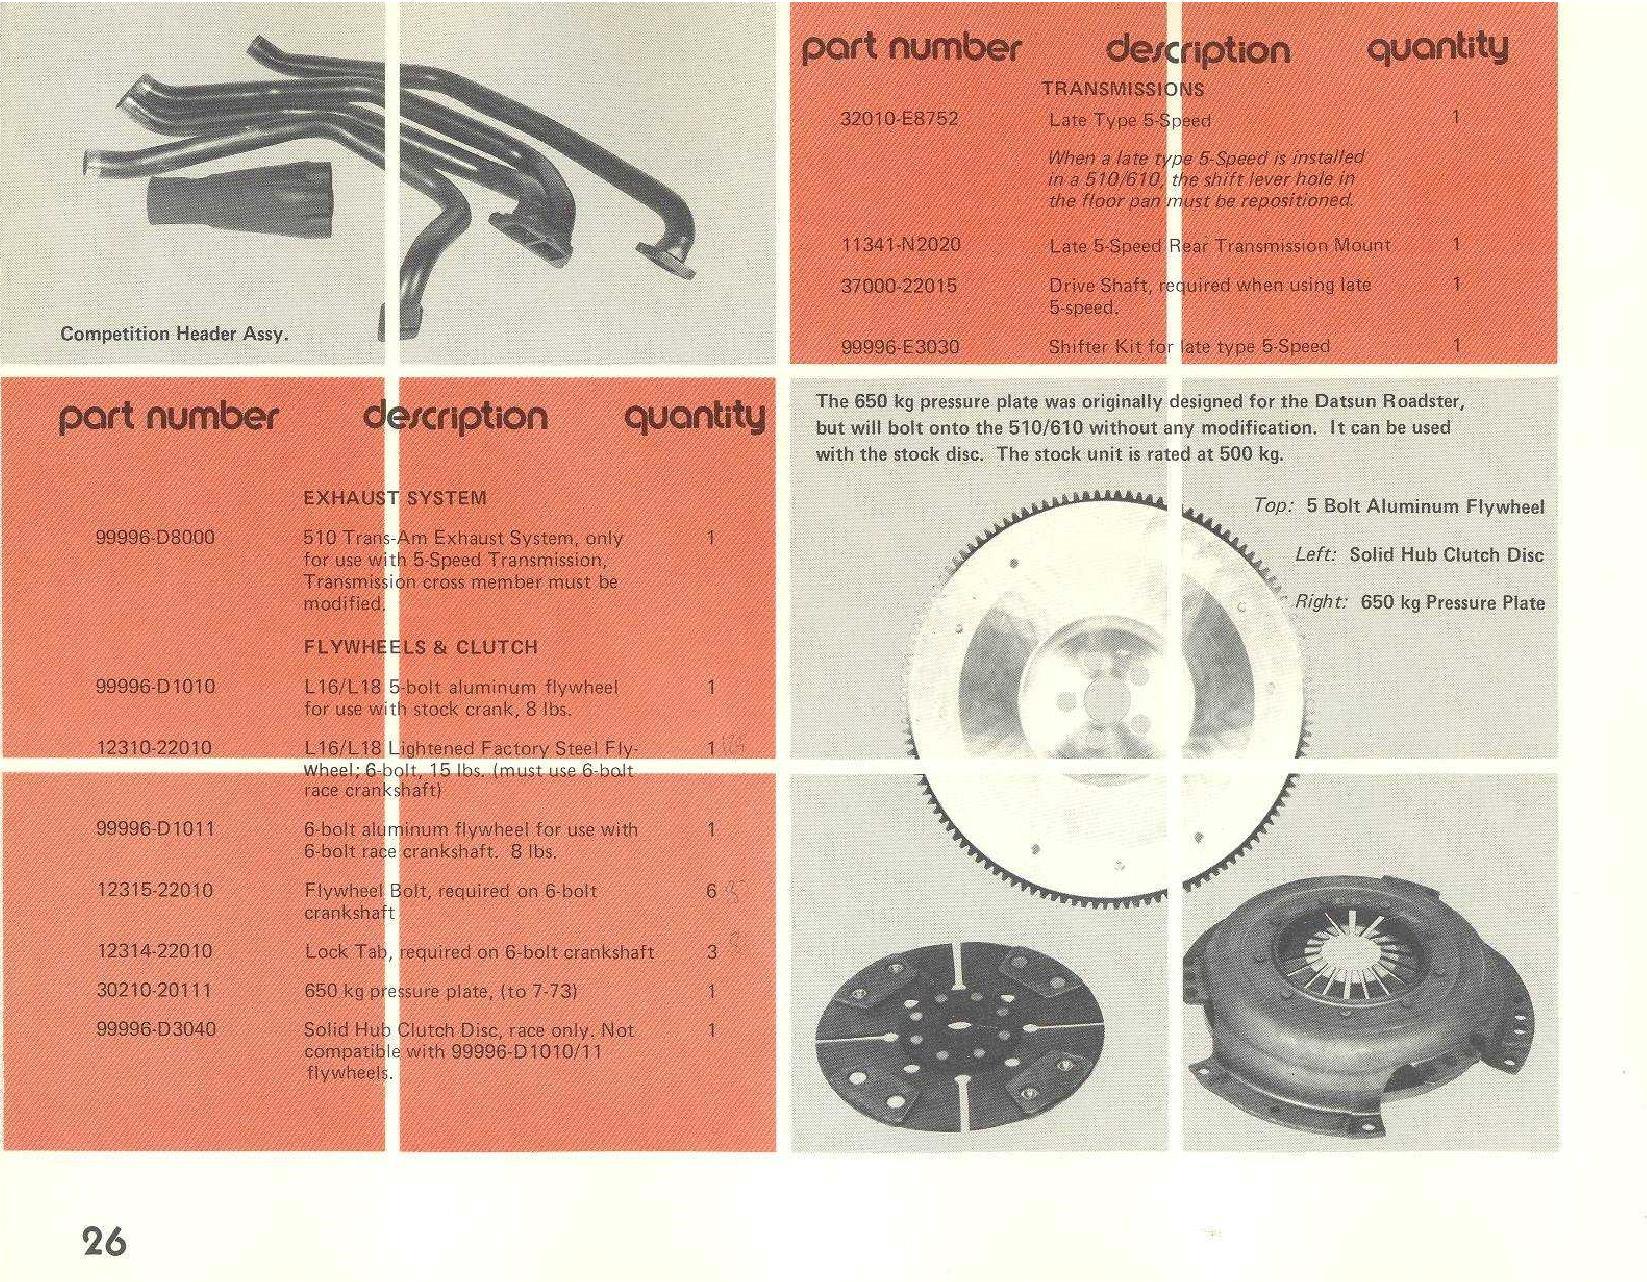
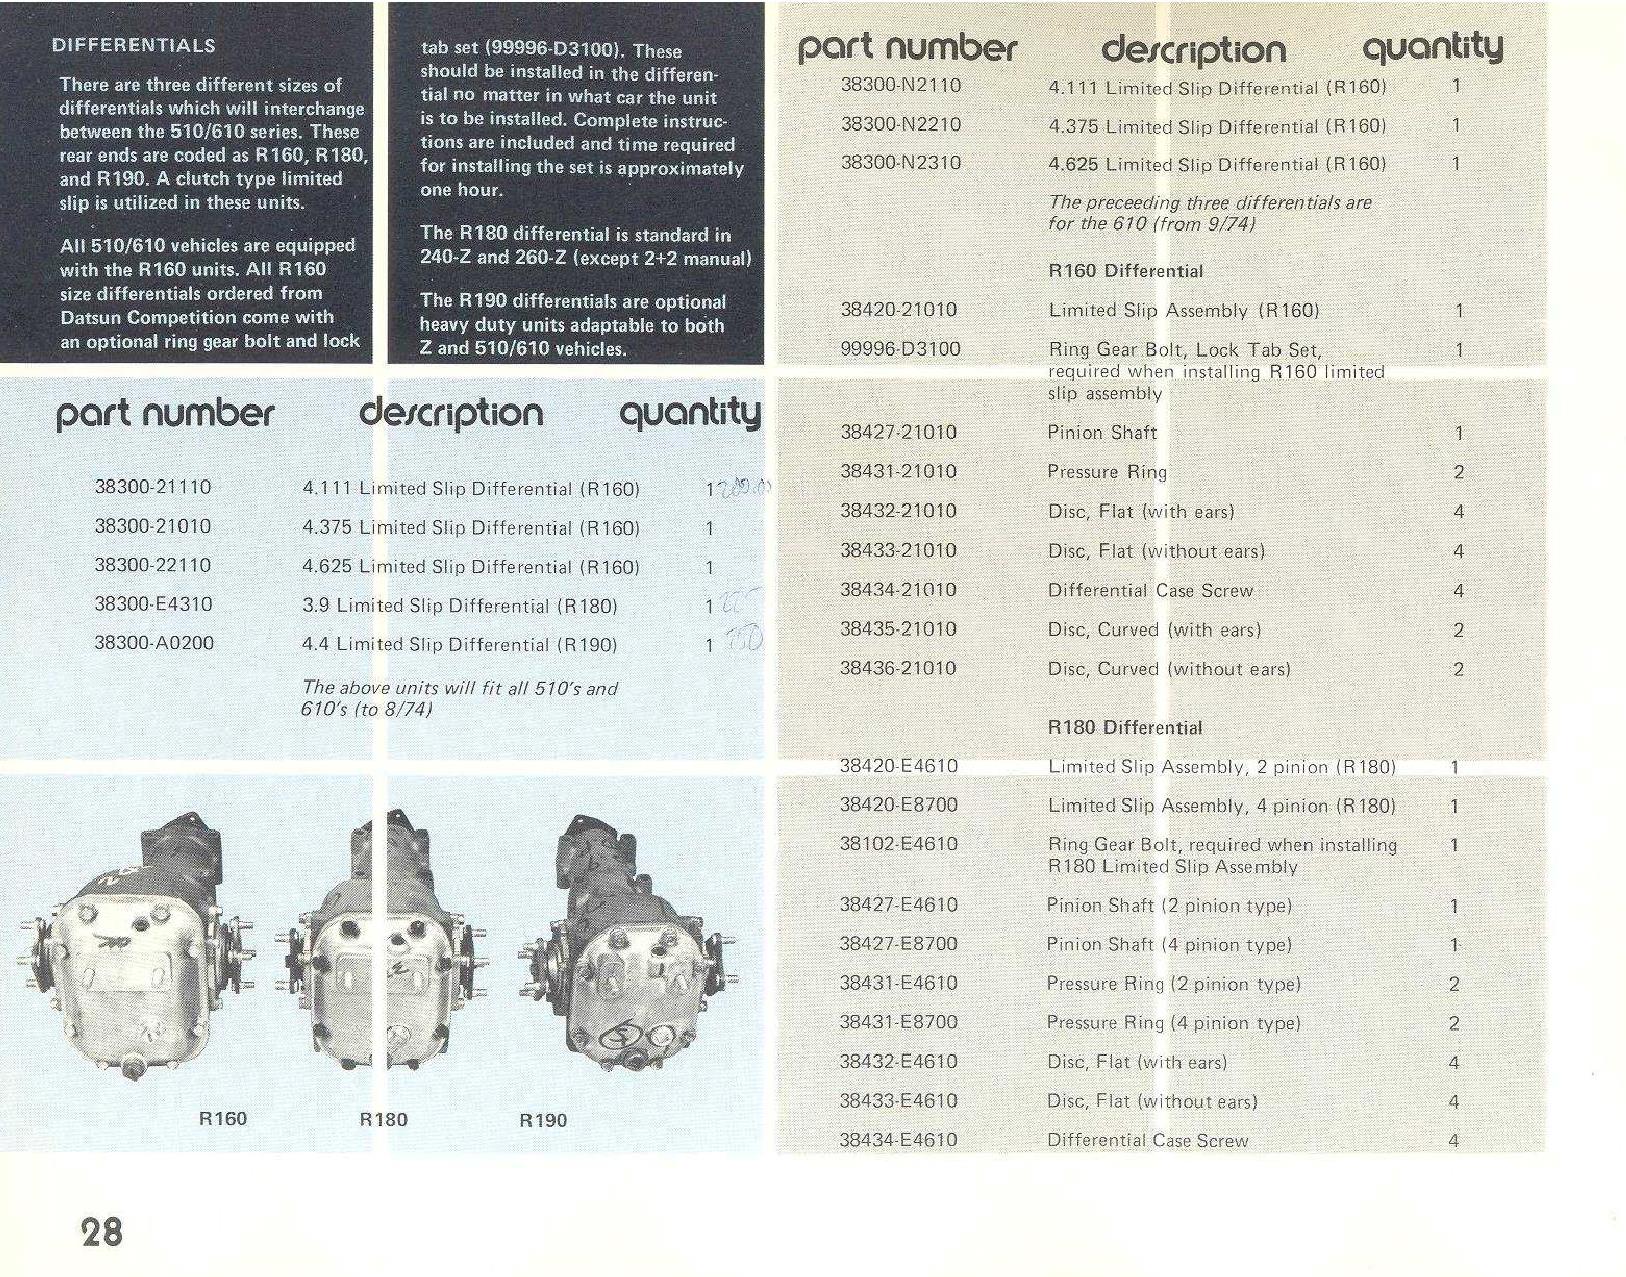
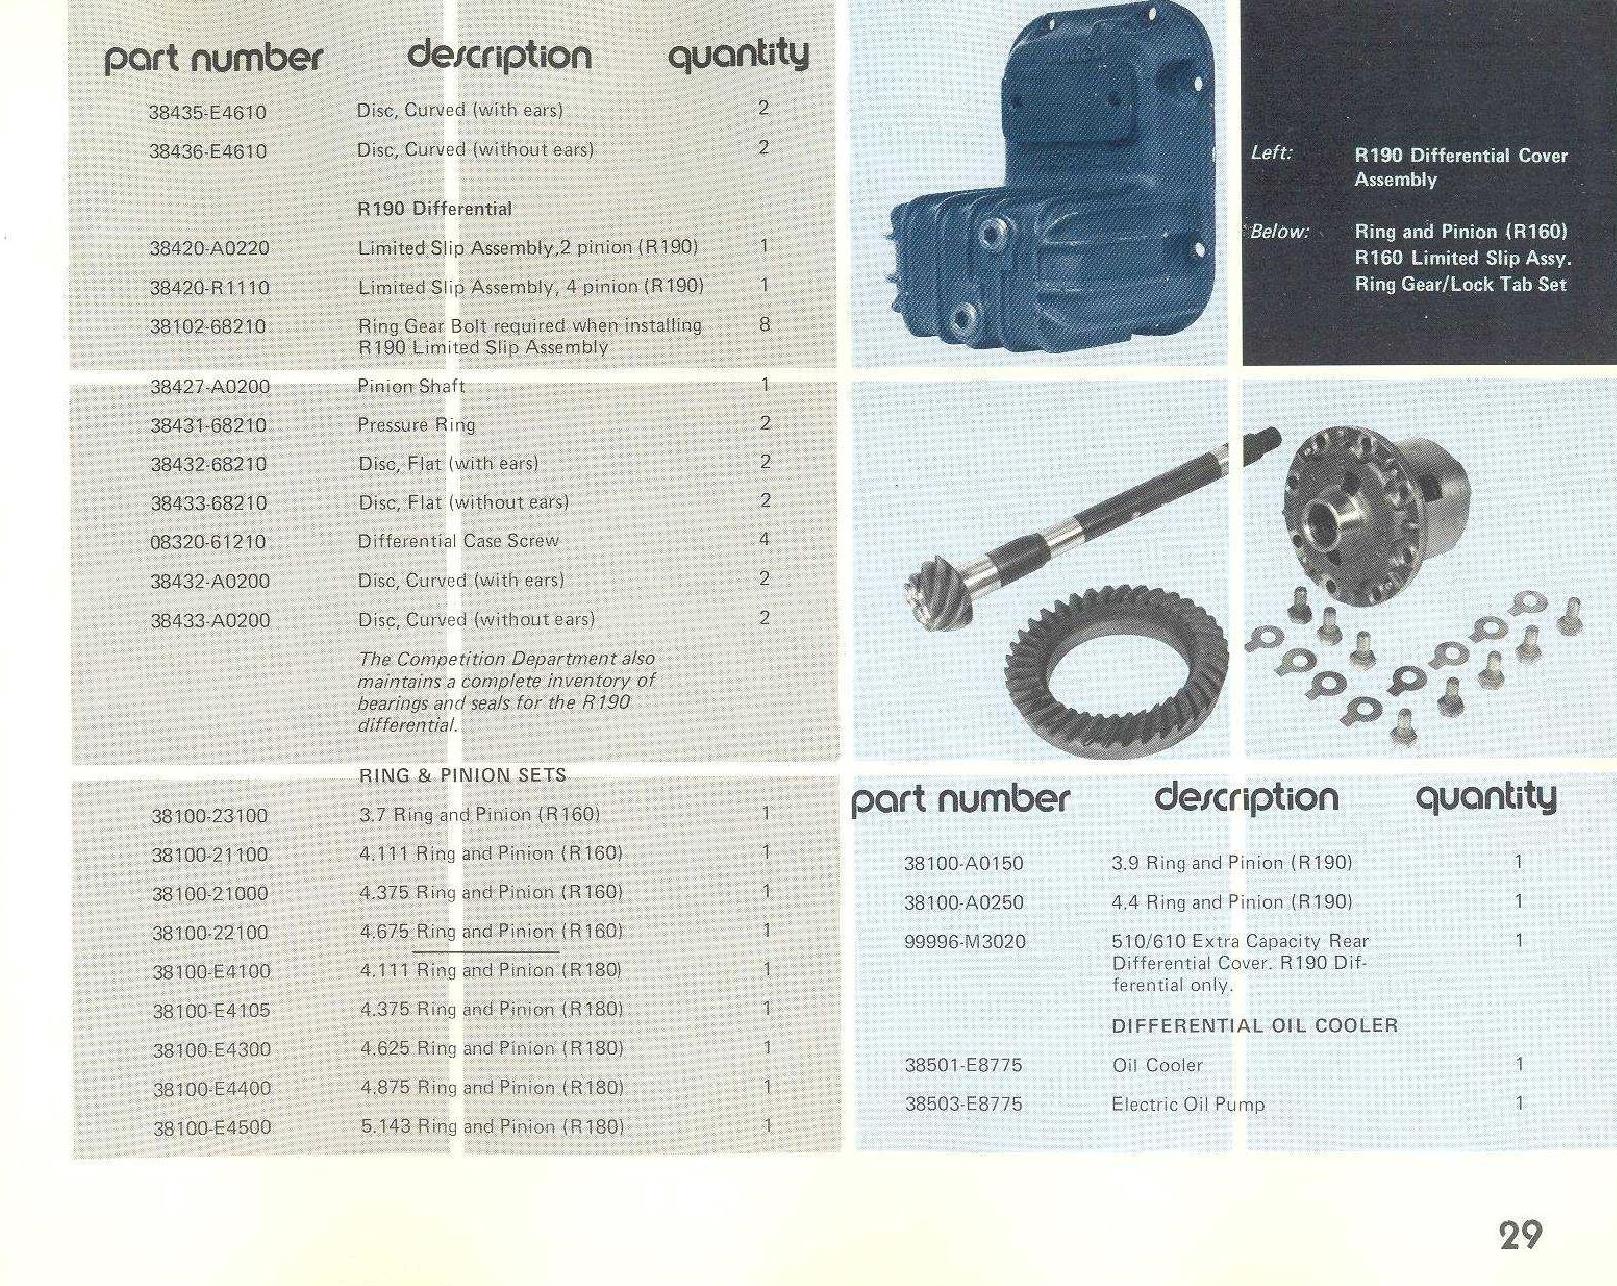
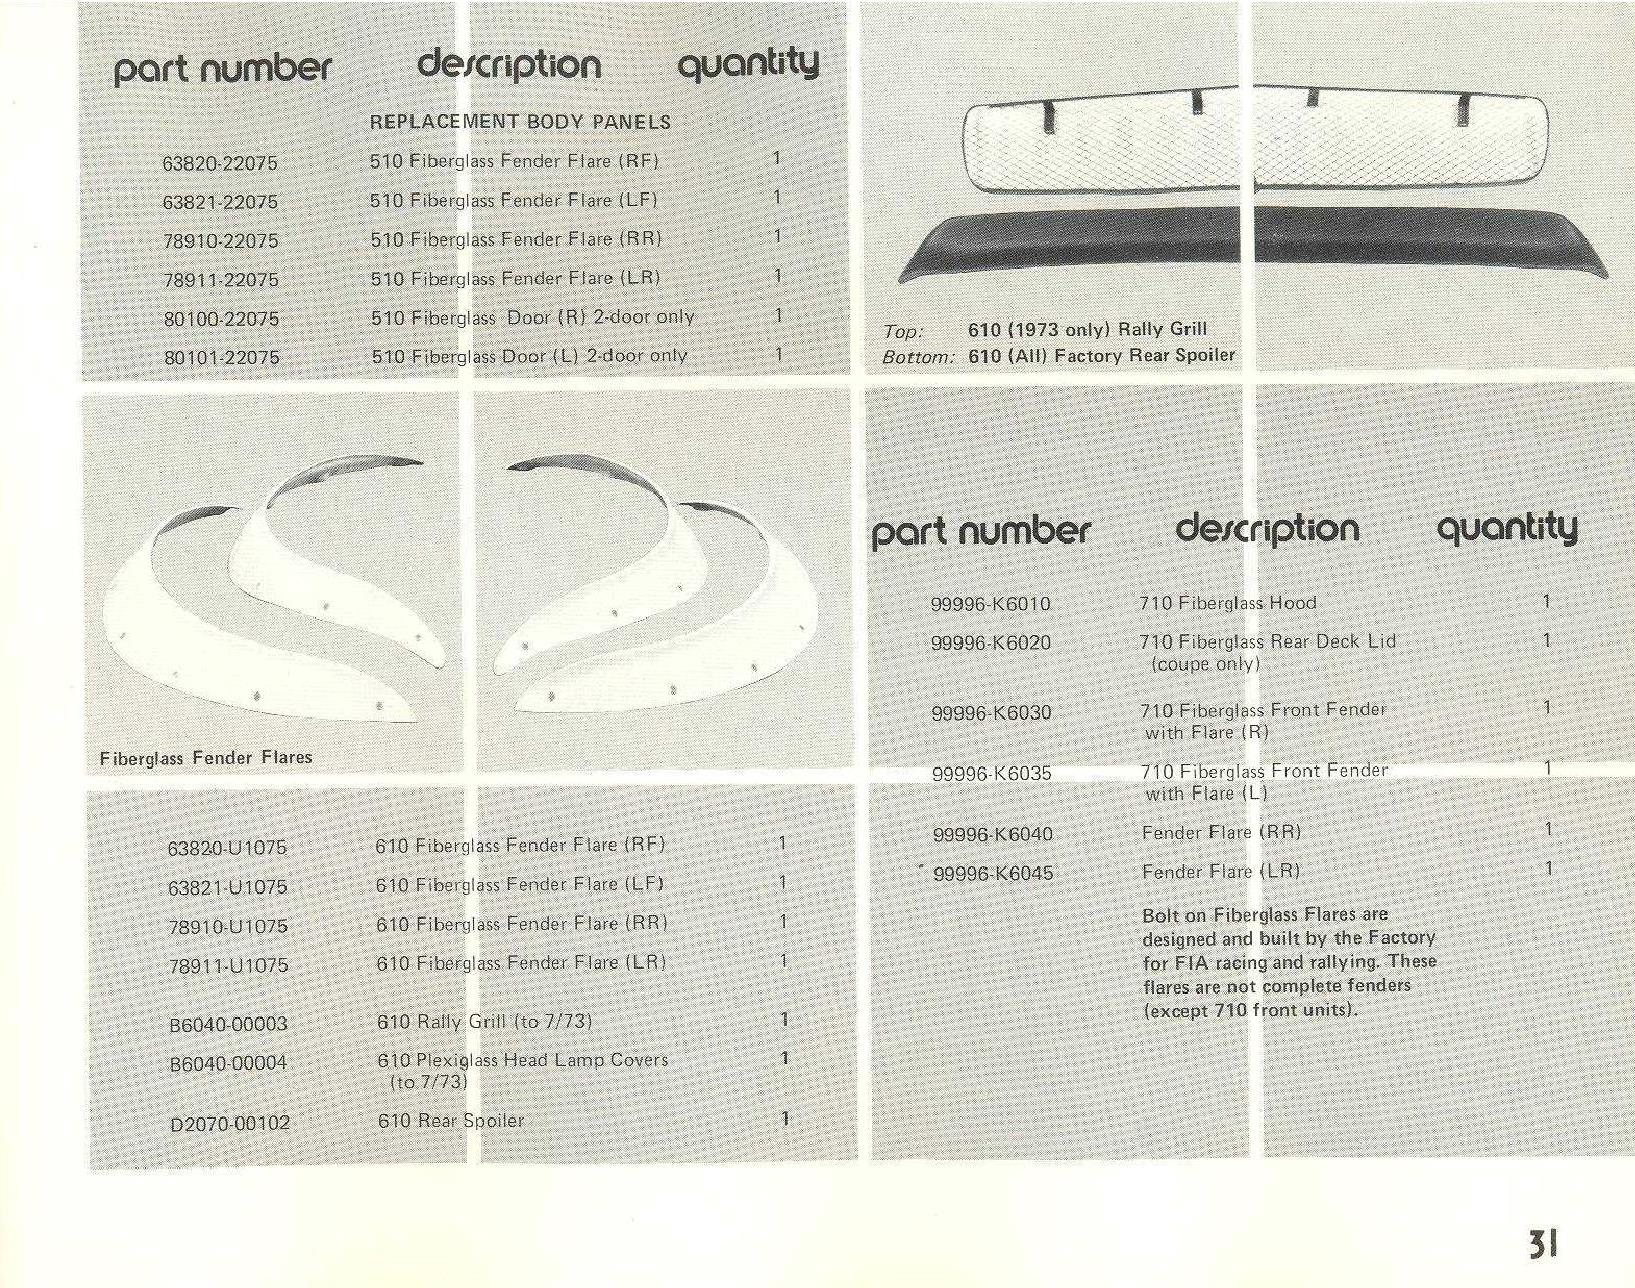
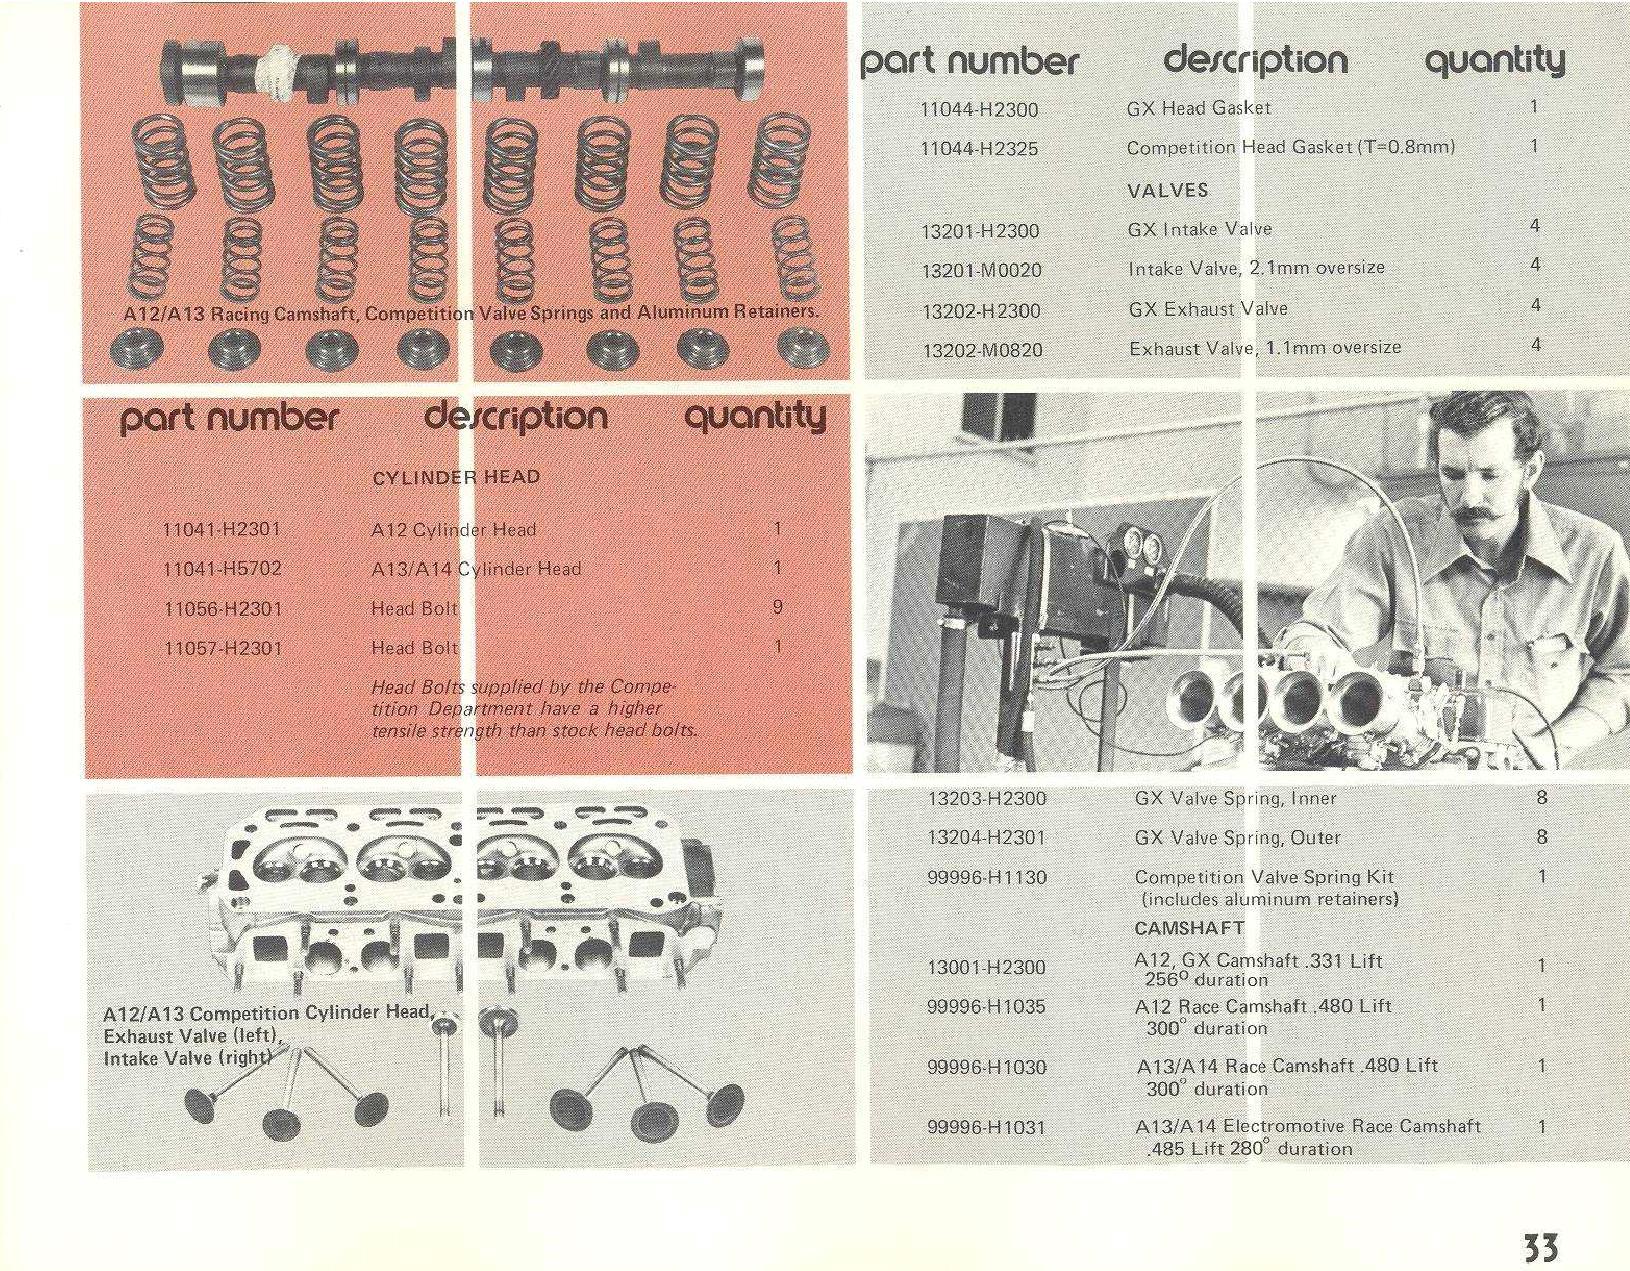
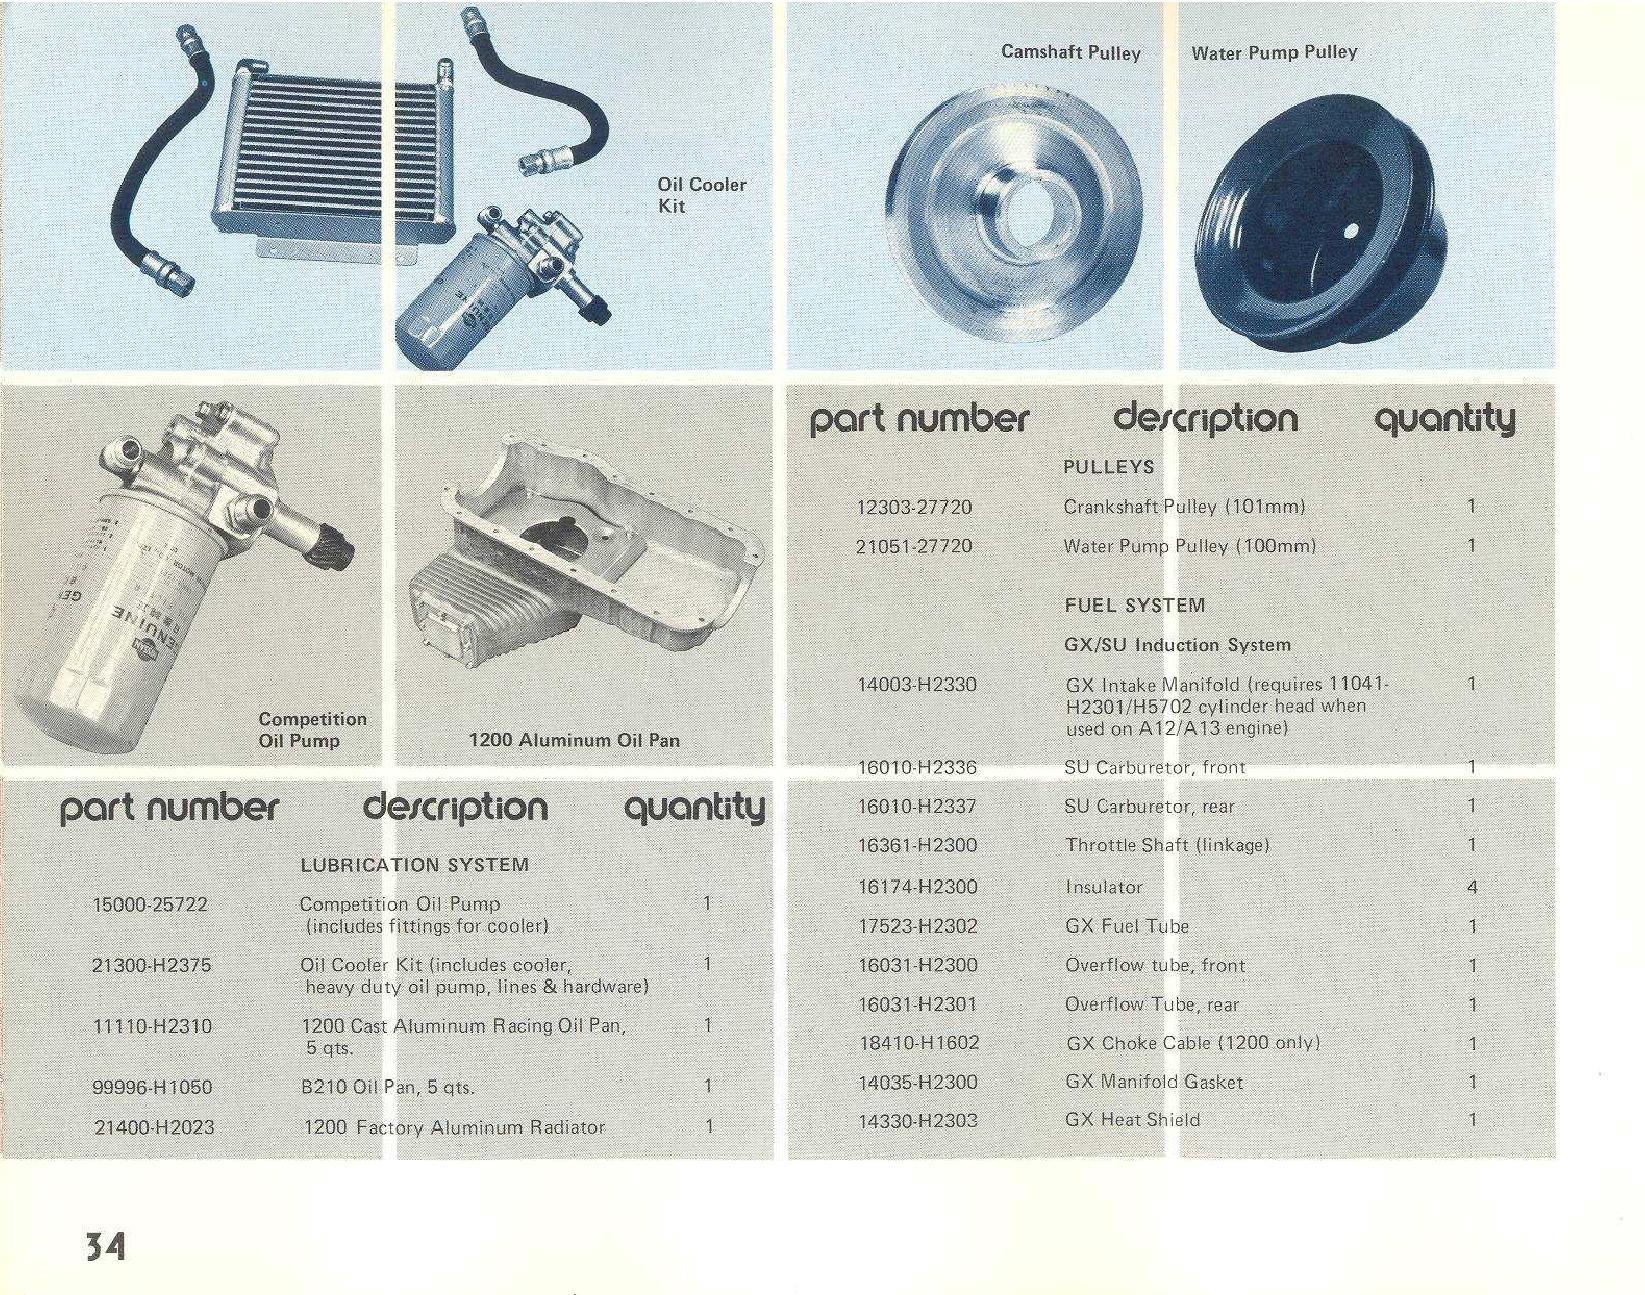
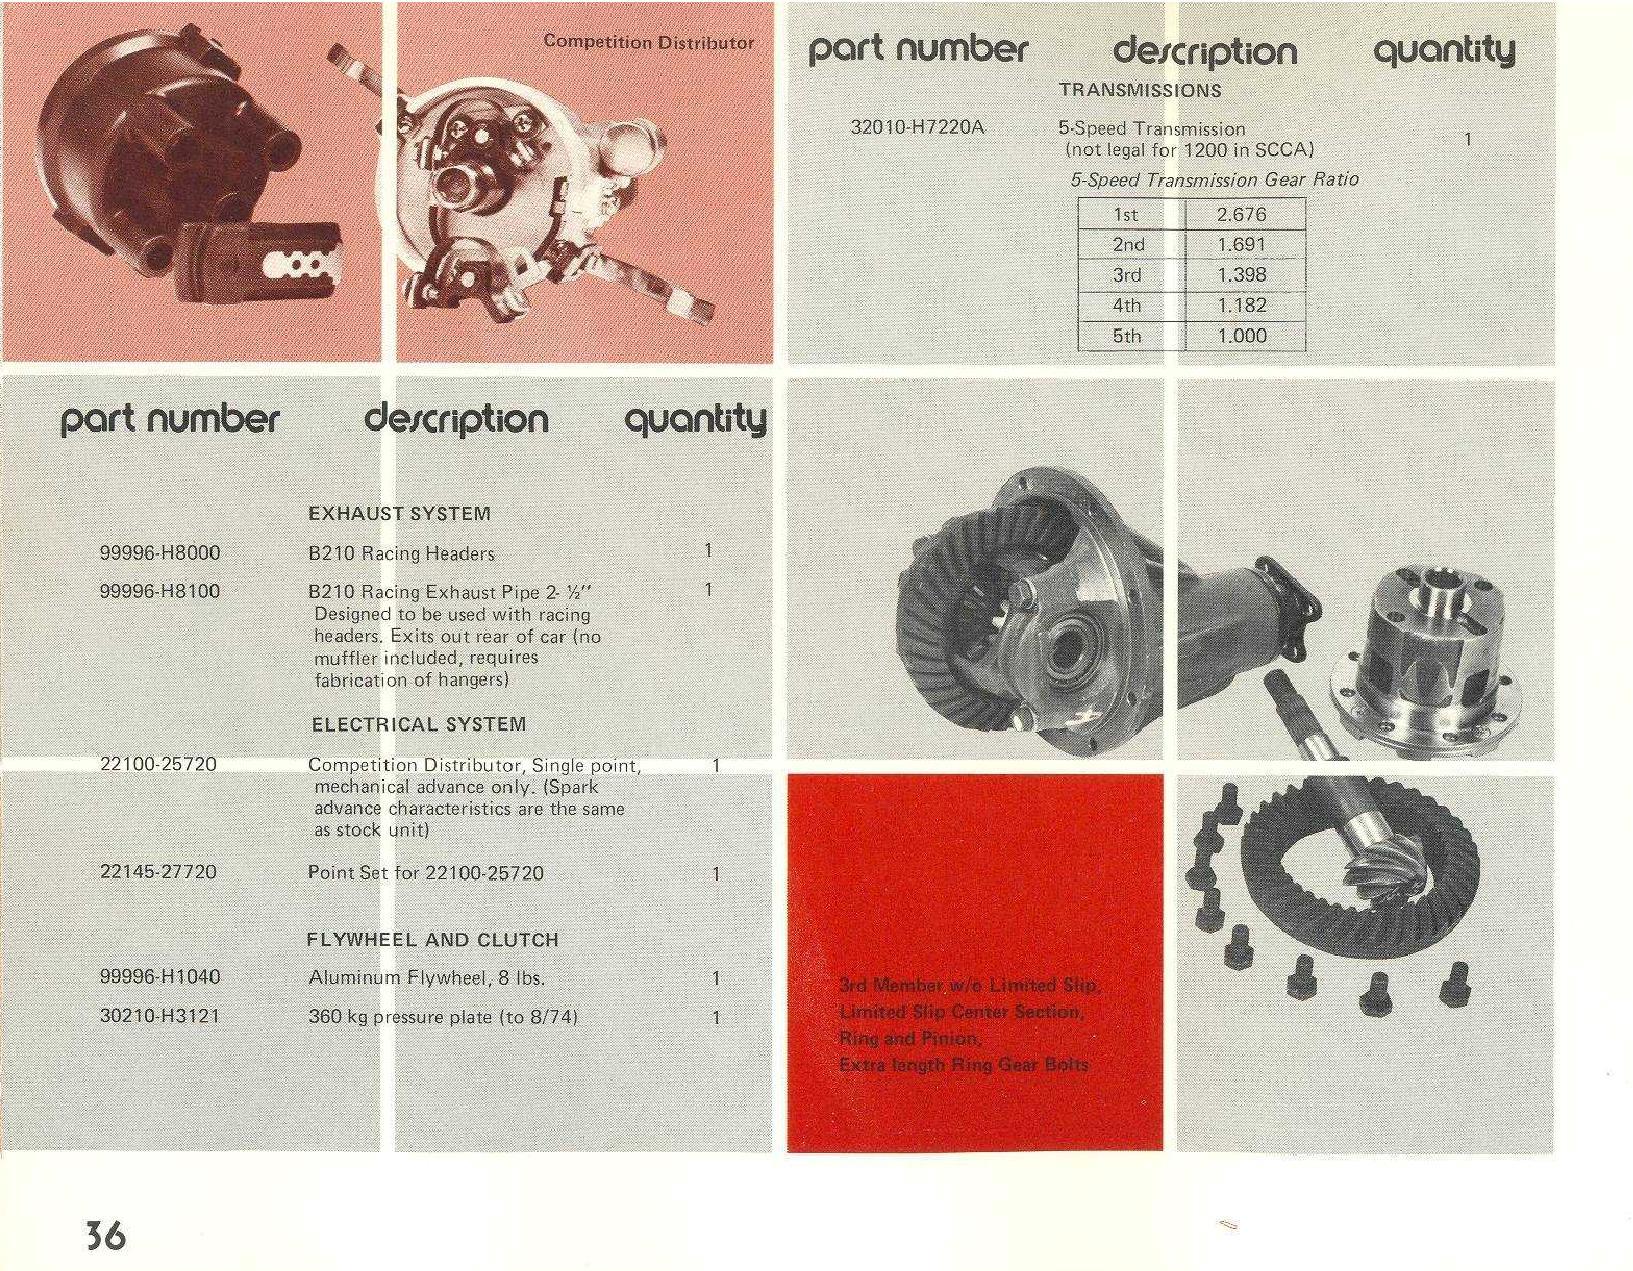
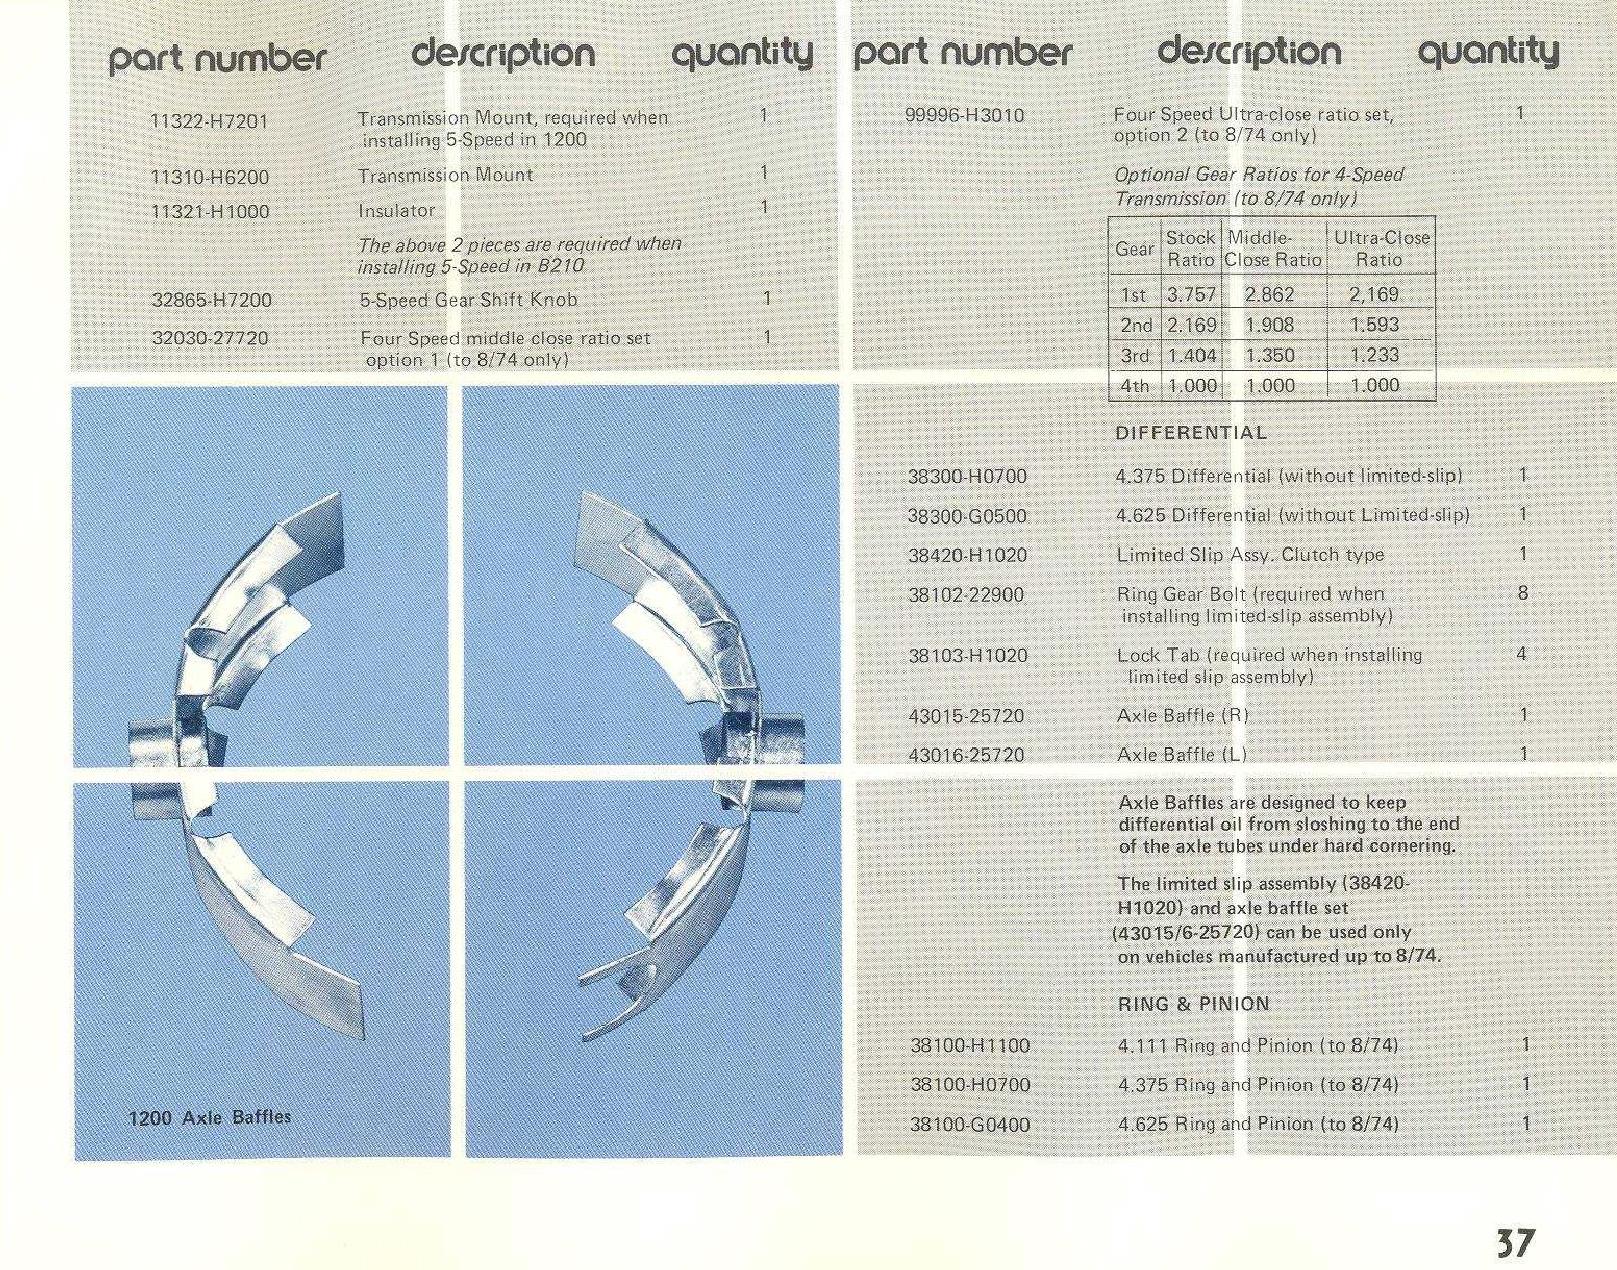
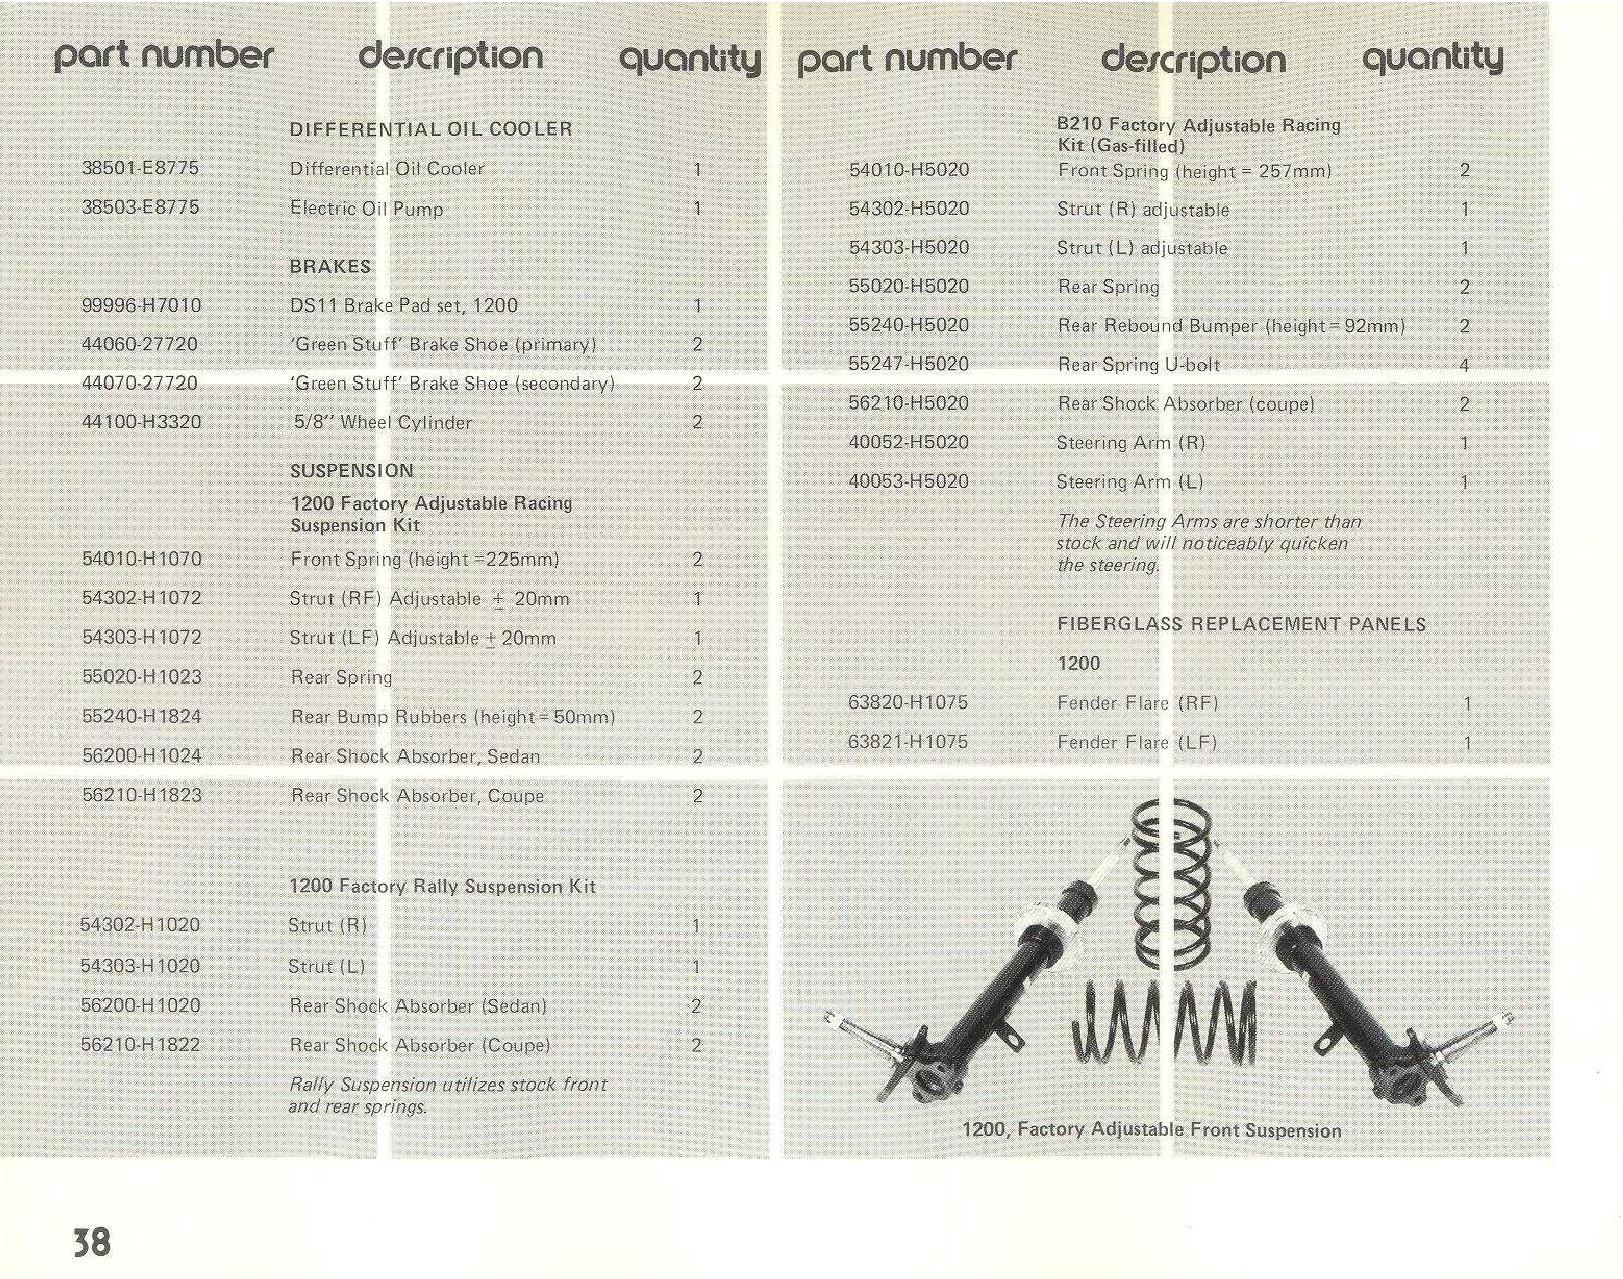
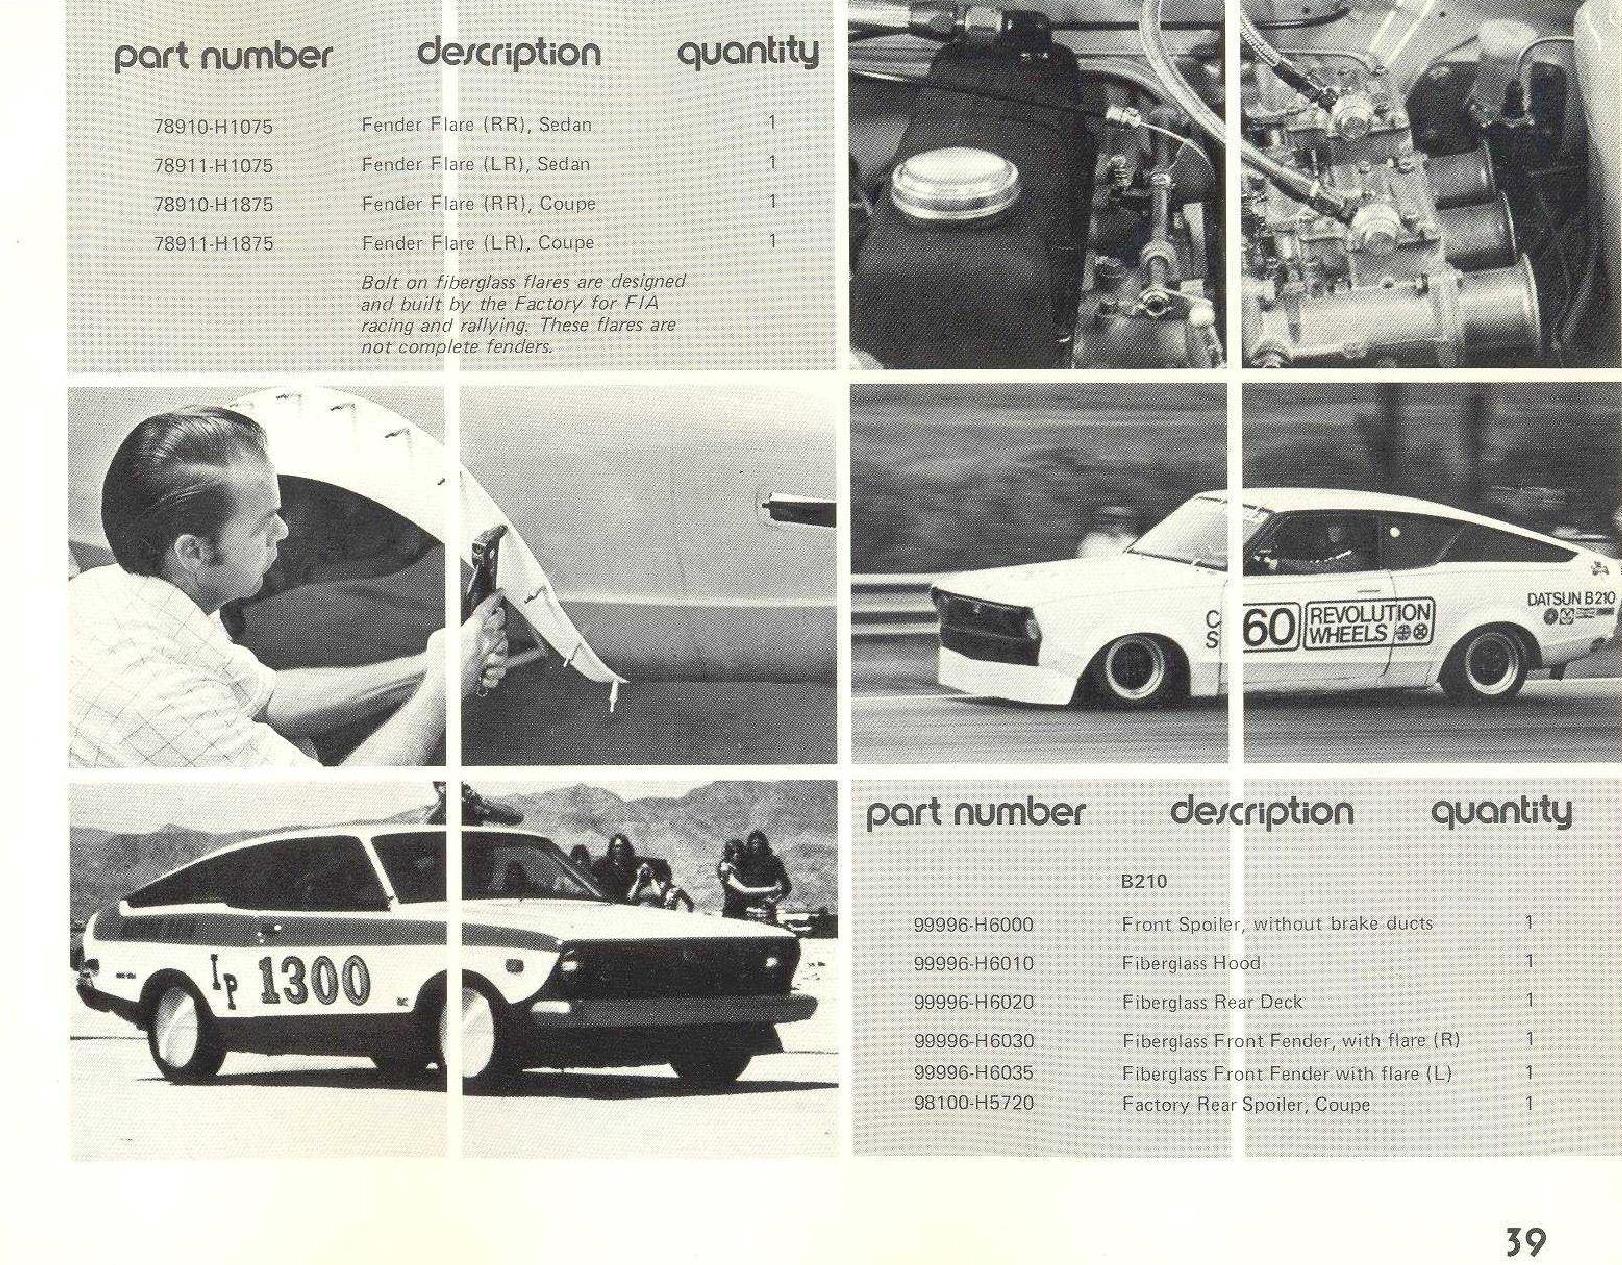
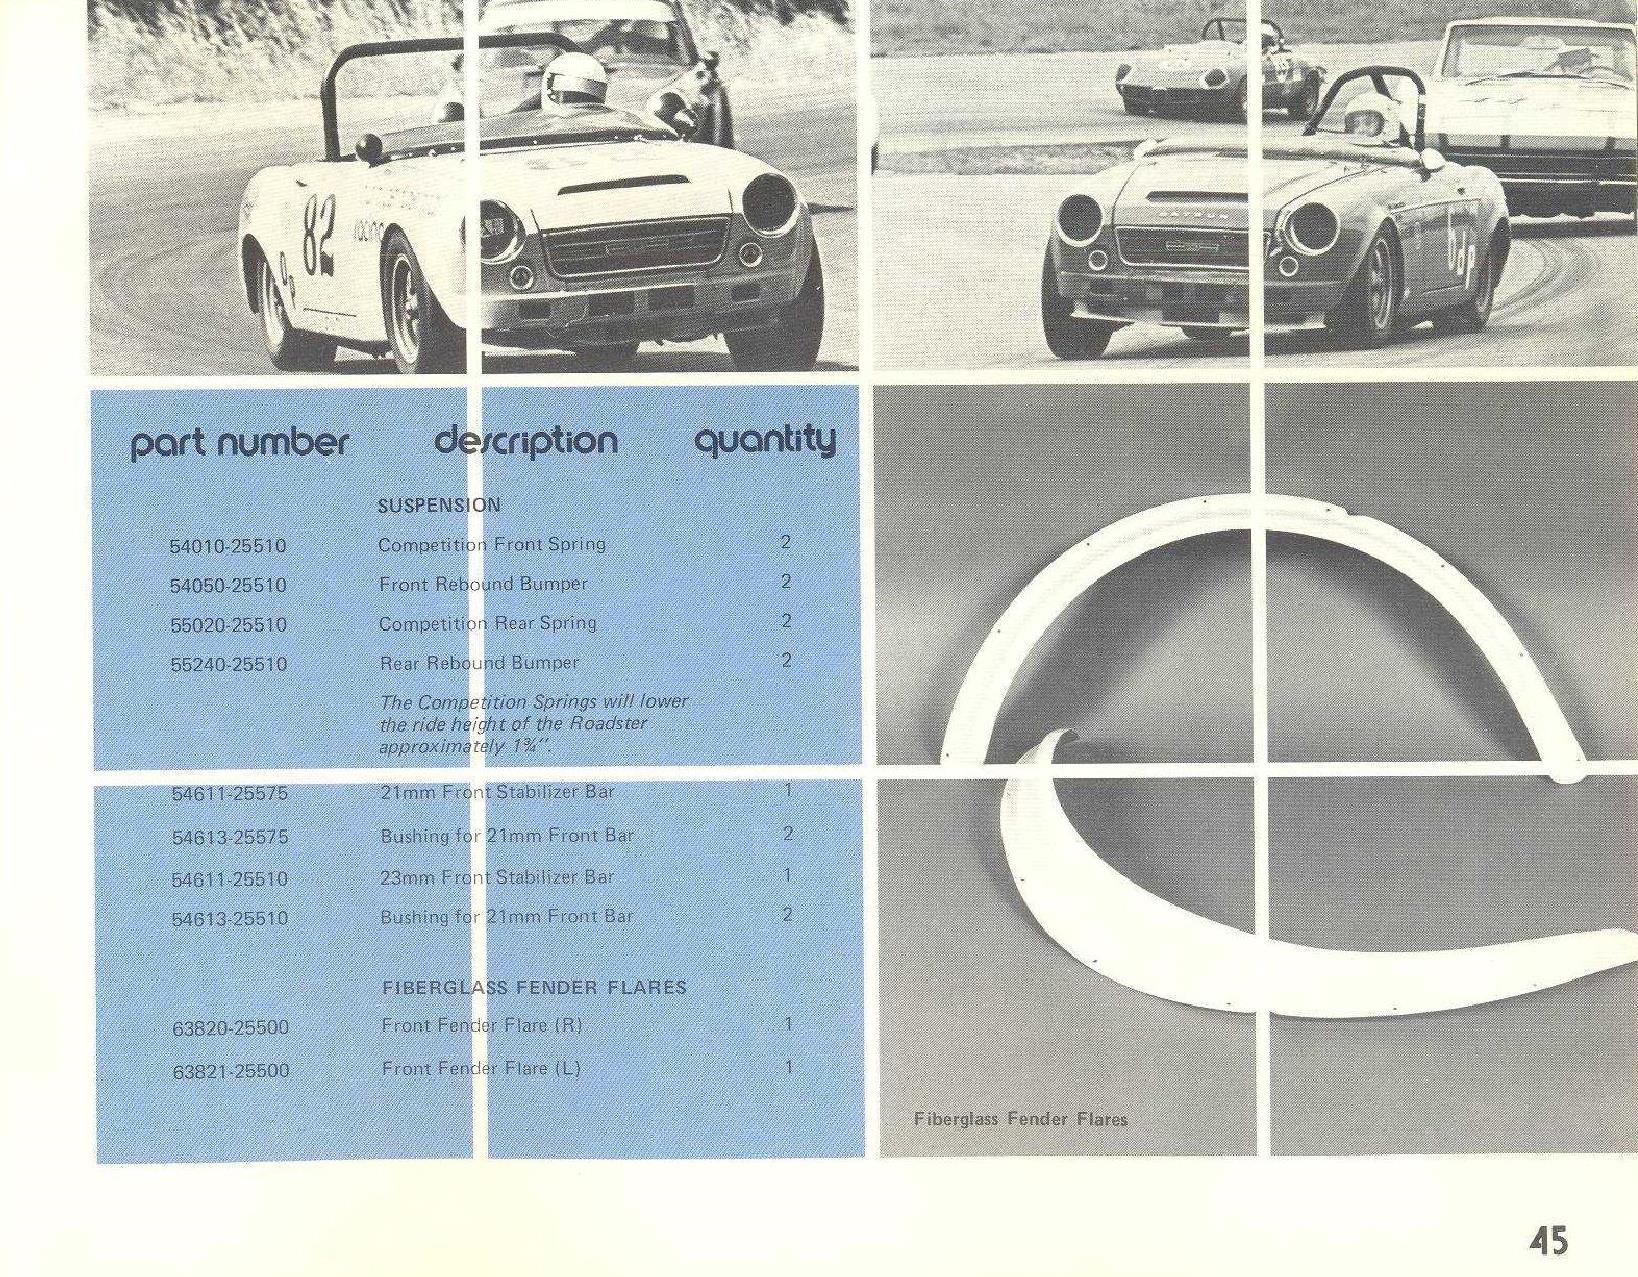
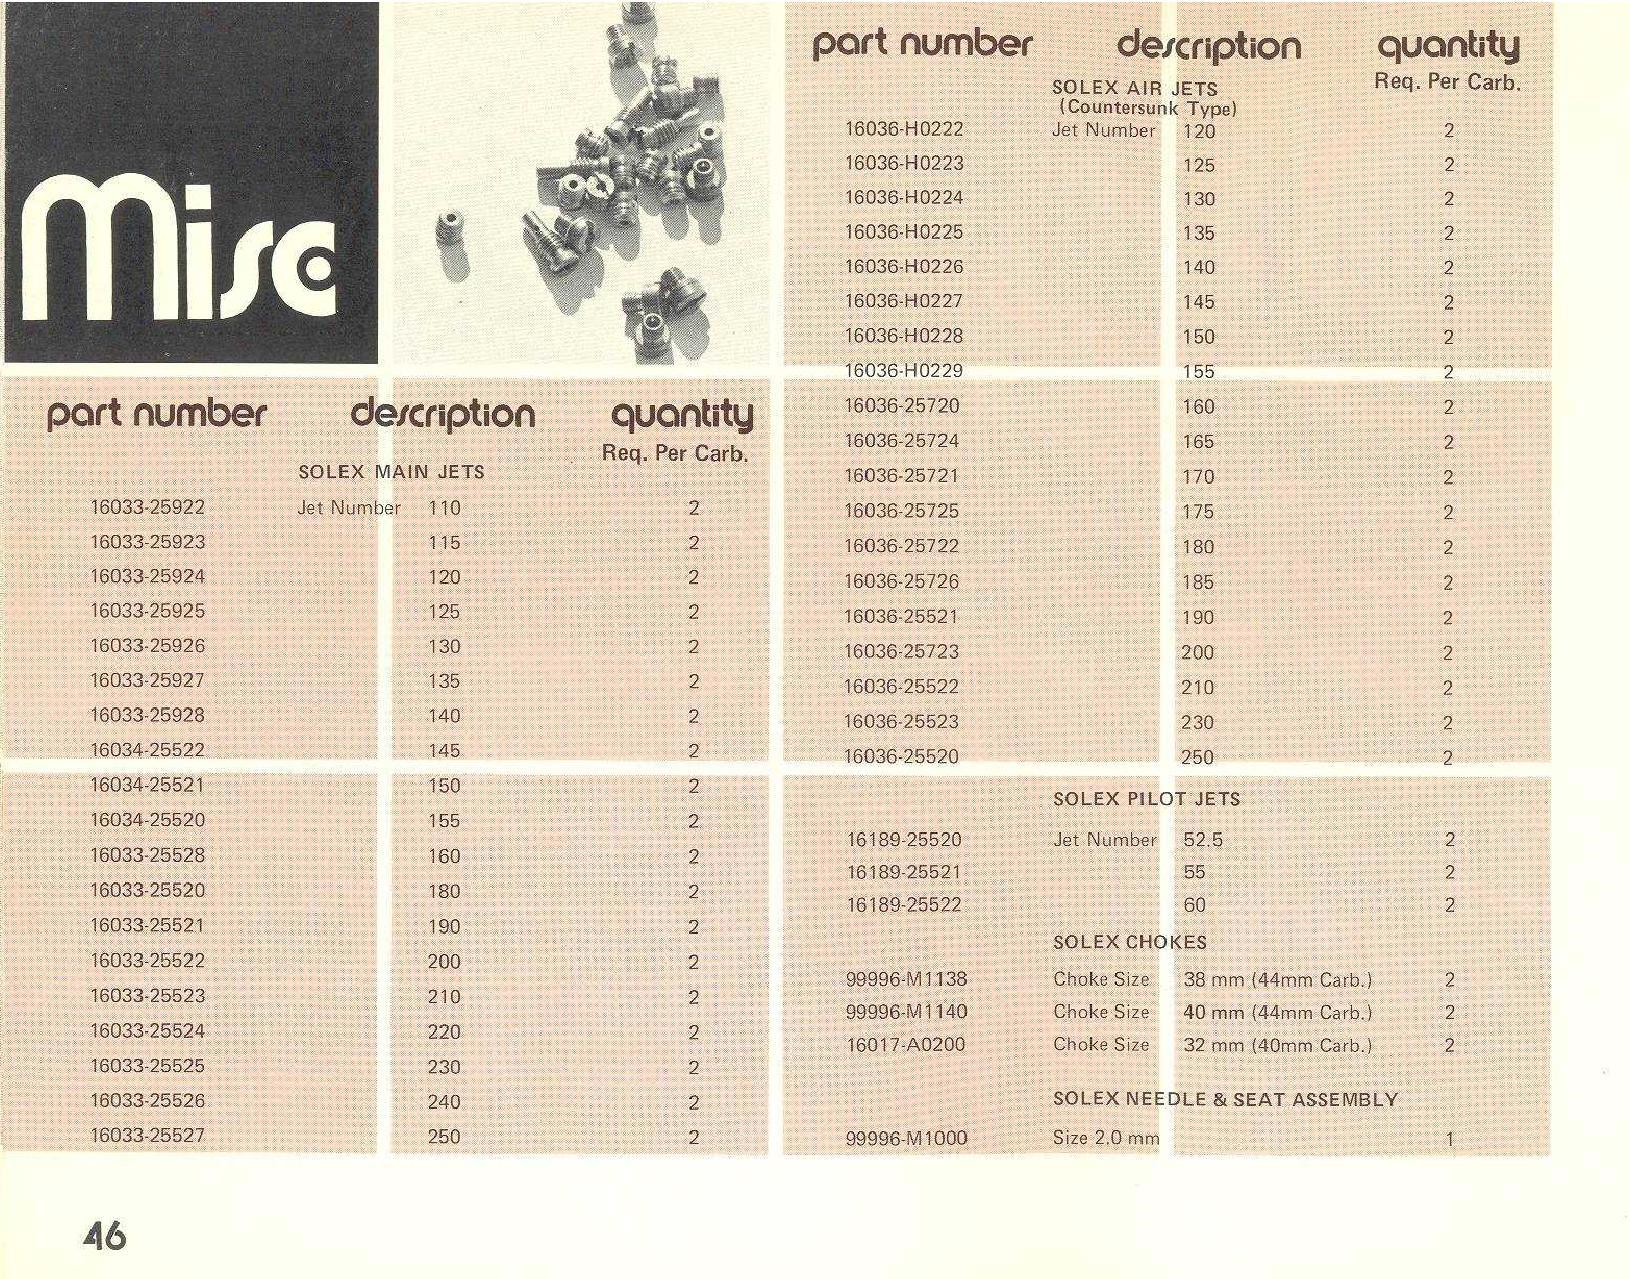
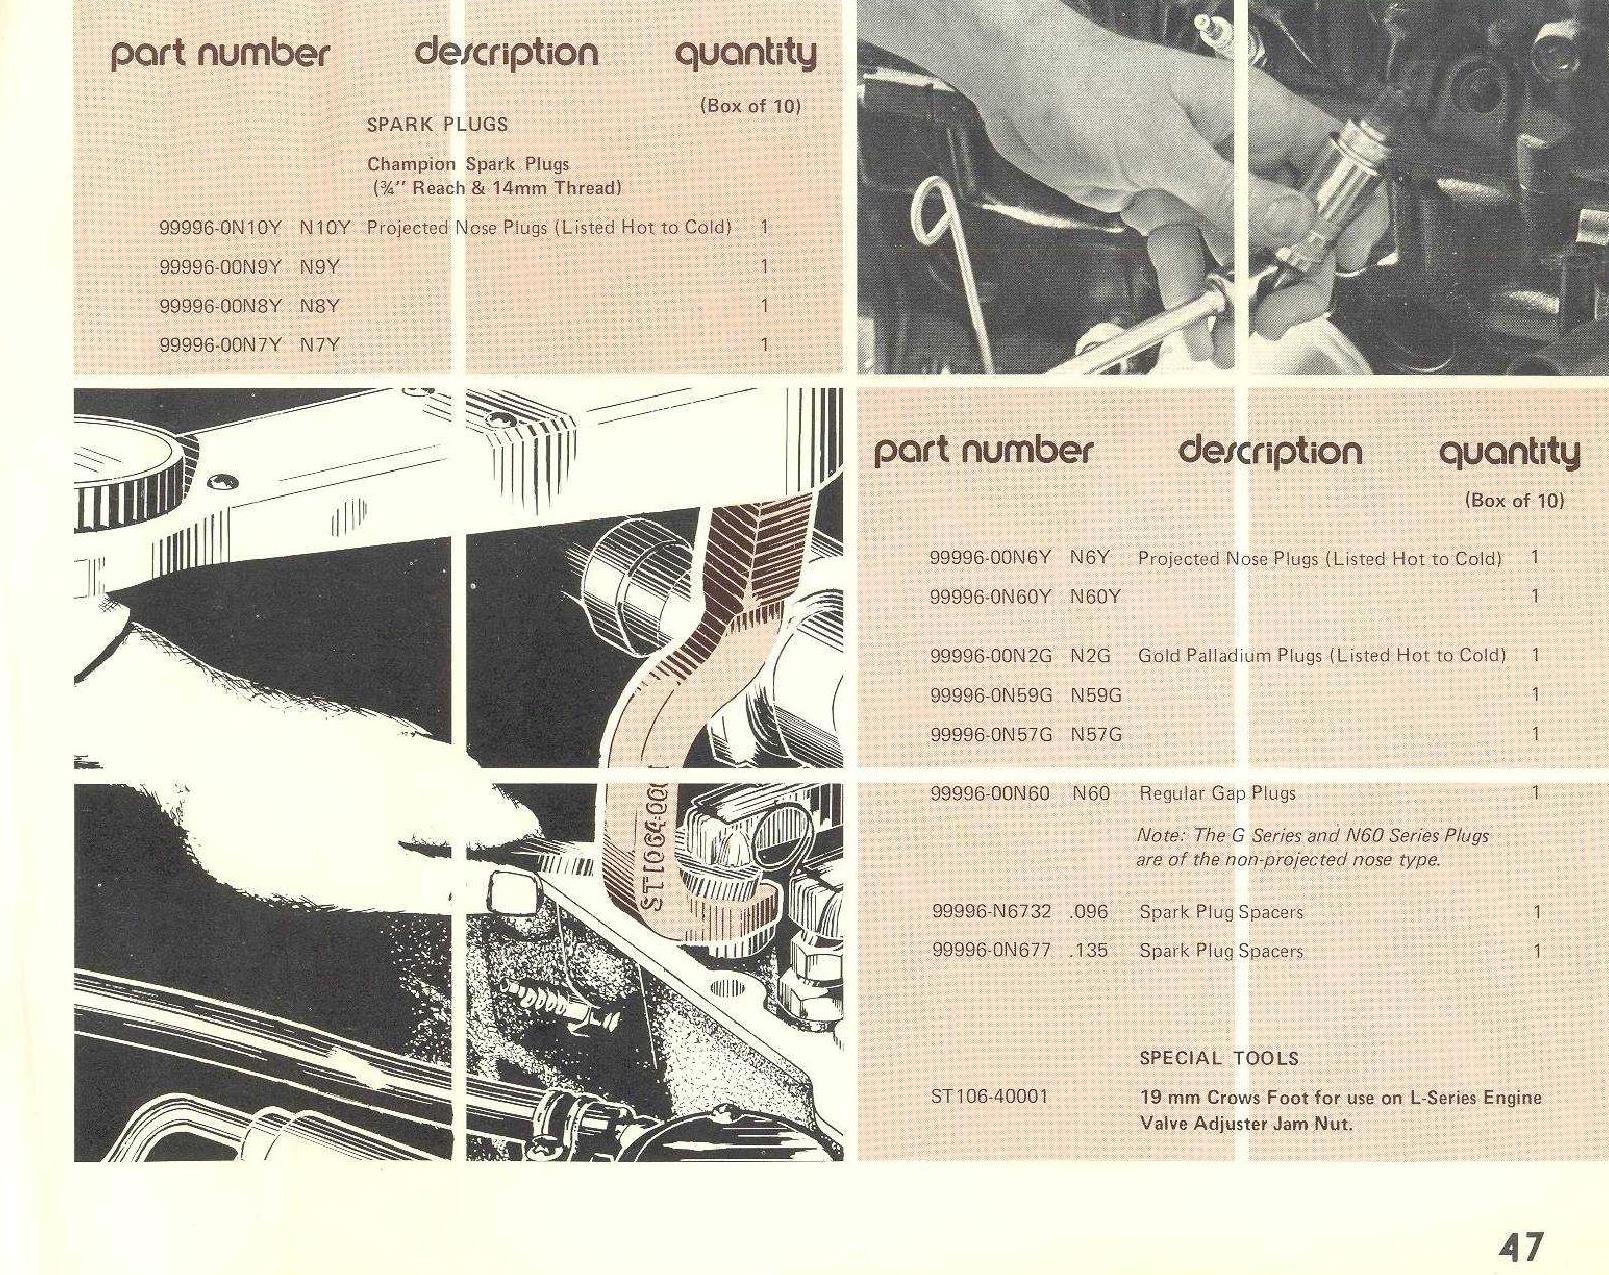
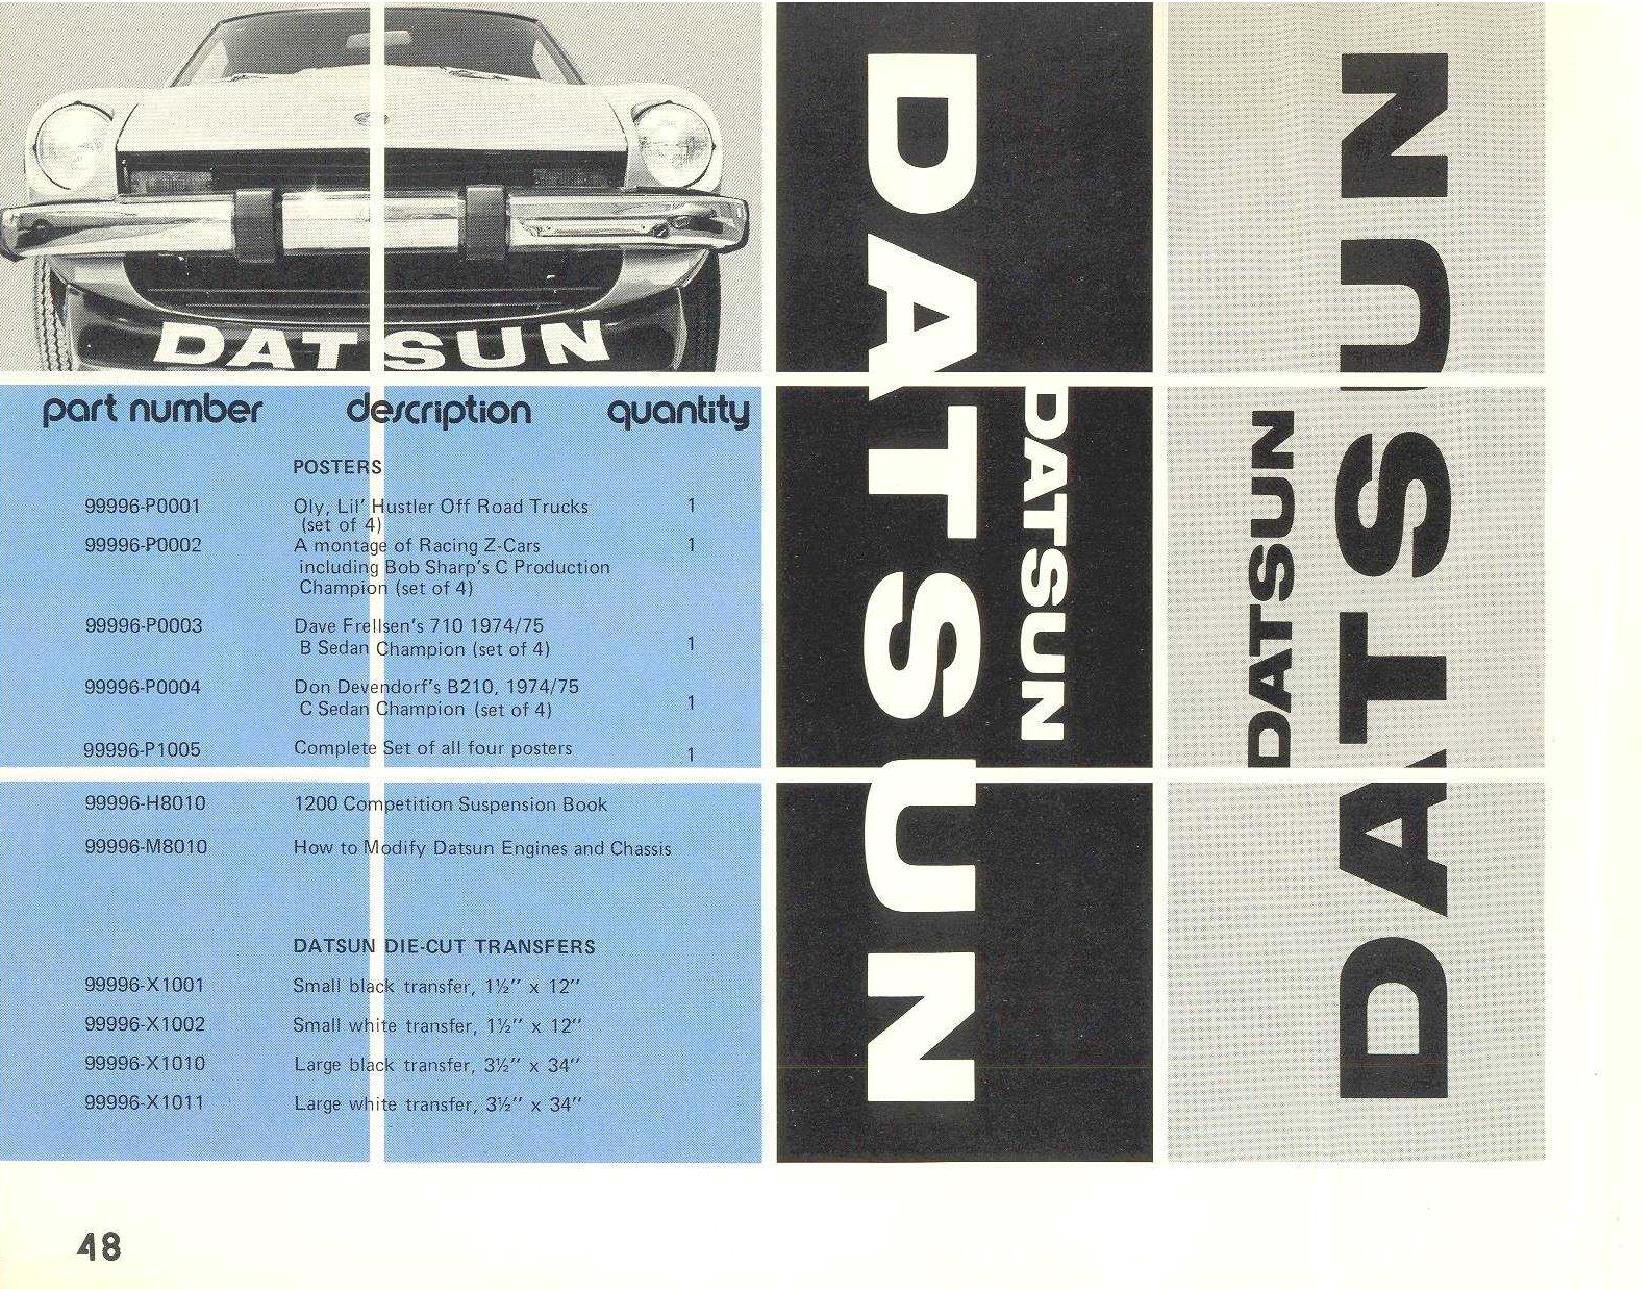
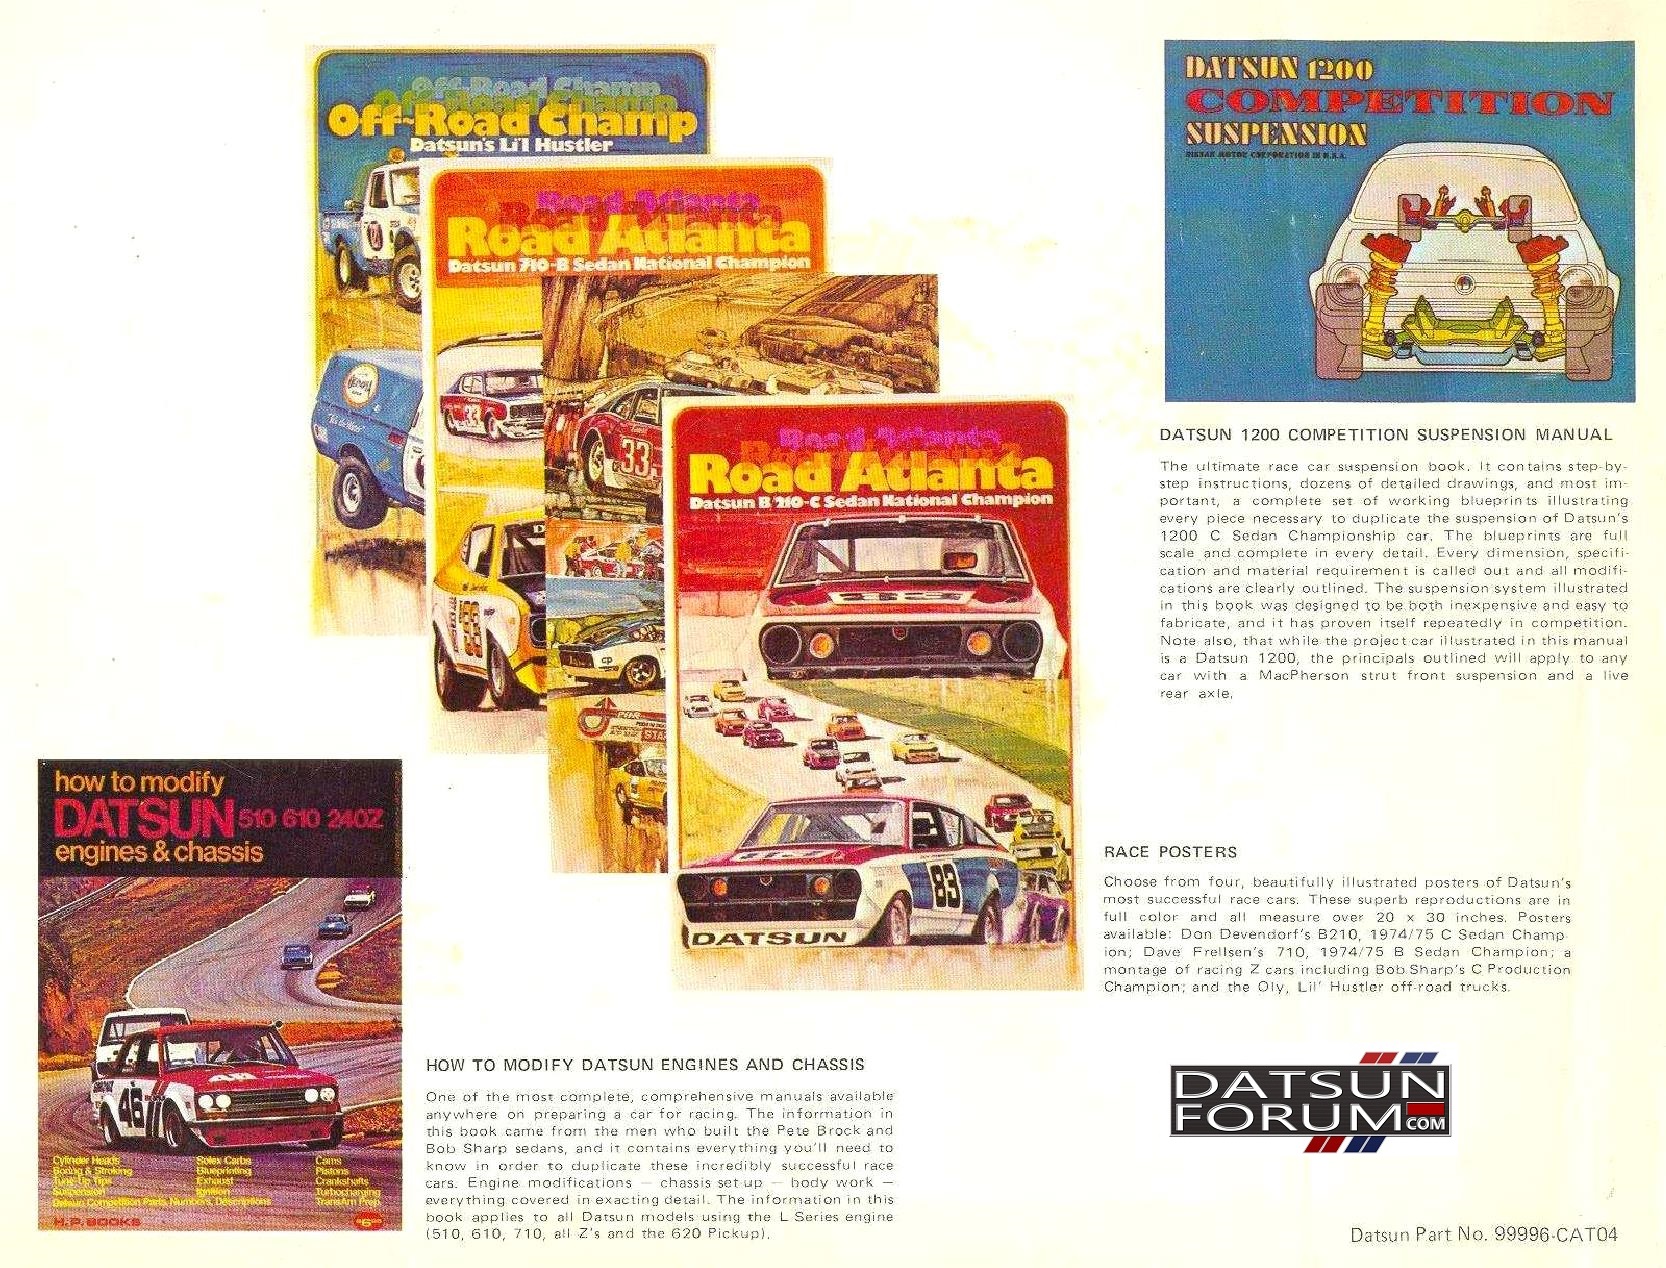
Part 2 of “Datsun Competition Parts Catalog 1976” – Click here to return to Page 1!


A forum for restorers, collectors, drivers and enthusiasts!
Part 2 of “Datsun Competition Parts Catalog 1976” – Click here to return to Page 1!
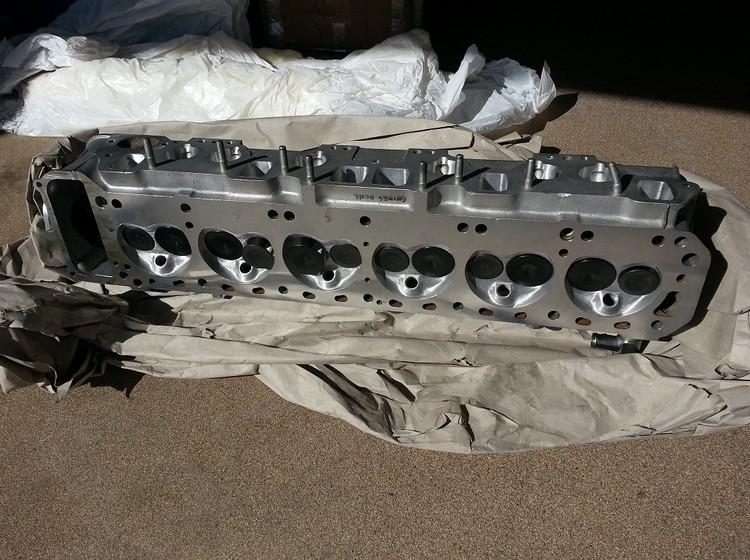
A month or so passed, and my stuff was finally done. $2400 later, I got the head back.
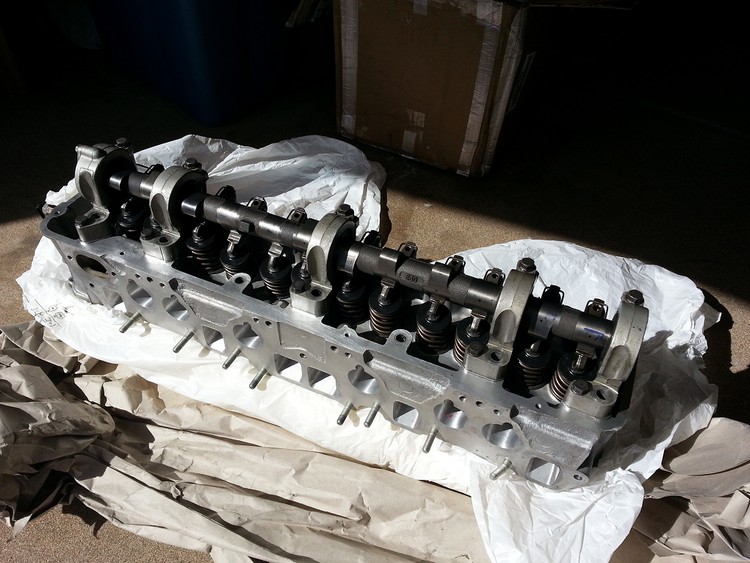
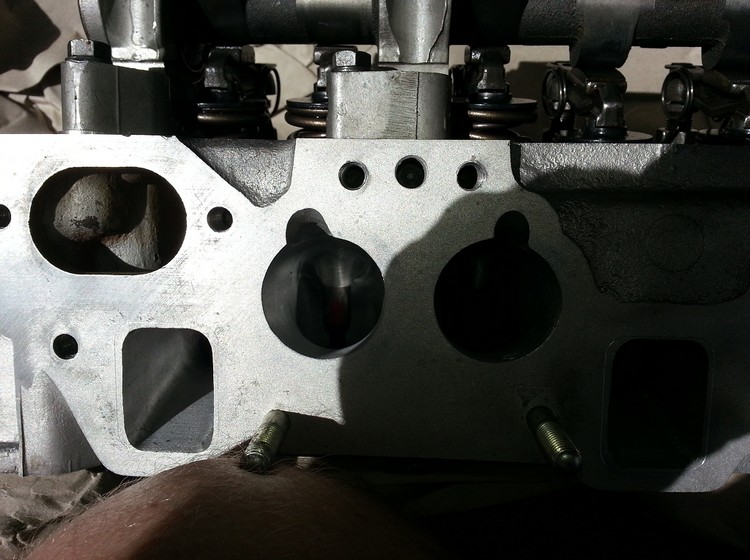
The intake manifold was machined so it was like a cone. Wide opening on the carb side, getting smaller towards the engine. The balance tubes were also drilled out and blocked off. The side you see below had a 45mm opening.
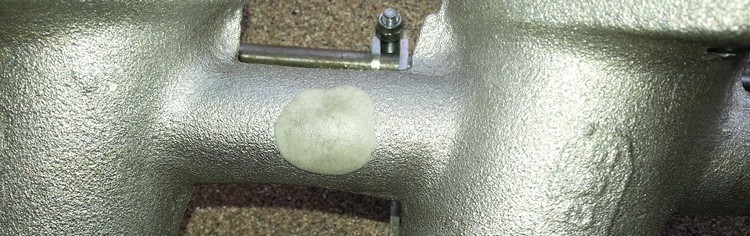
Putty on the balance tubes to block them off. I guess the idea is, you don’t want one tube pulling more fuel/air mixture, robbing from another.
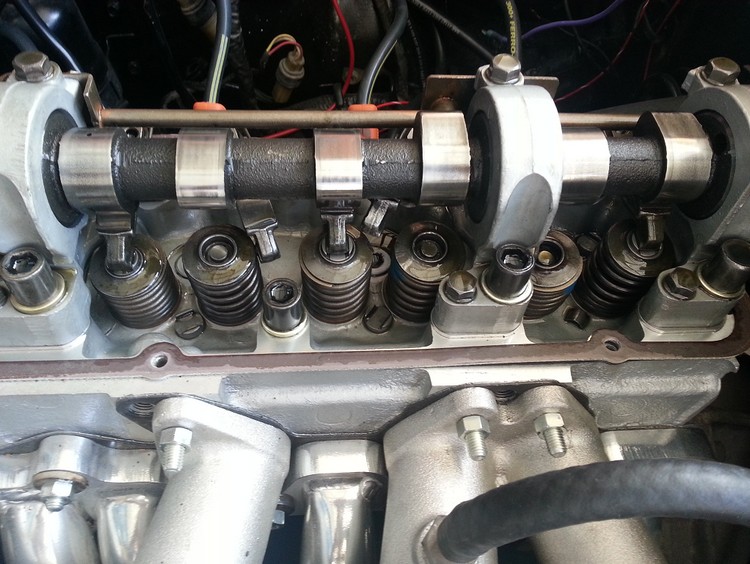
I started assembling the head back onto the engine with a new Cometic MLS gasket that Dave provided. Almost immediately, more problems – the head bolts started snapping before they were torqued to spec! I found someone local who had some replacements for the broken ones, only to have them break again! Frustrated, I ordered some ARP head studs, and it locked down as it was supposed to.
Started up the engine, and heard a GLORIOUS sound. Pulled it out of the garage, and into the driveway where I could inspect to make sure everything was working ok. Everything was NOT ok… I had coolant seeping out towards the rear of the head. Torqued some more on the head bolts to ensure it was torqued right, and it still didn’t fix the issue. After some reading and asking around, I was told to get some copper spray to use on the MLS gasket. This would help fill in any little gaps that may be allowing coolant to get free. Drove it back into the garage, and sulked. Take the head off again? I was getting to be a pro at this unfortunately.
After I got the head off, I put some Permatex red RTV down on the block to also help. Sprayed the MLS gasket with the copper coating, and again reassembled the head.
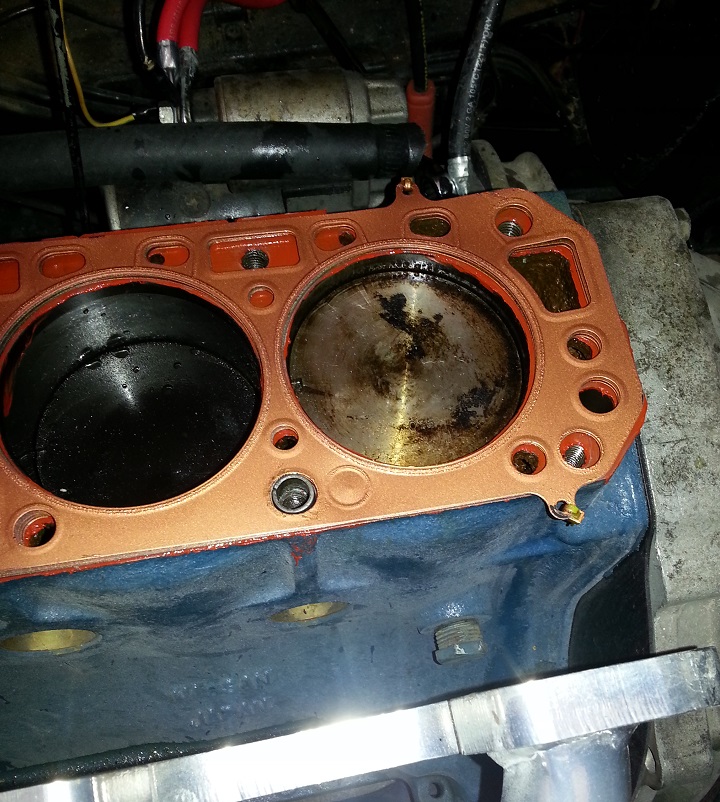
The engine started up, but again coolant came out, flooding the #6 cylinder. Nothing to do but pull the head off again. Now remember… this was supposed to be a brand new remanufactured engine. I had put less than 500 miles on this engine, and 0 miles with this Rebello head!
I got a straight edge and put it up against the block near the rear. I had sunken gaps everywhere around the head bolts and coolant passages! This wasn’t supposed to happen. This was supposed to be a good rebuild from a respected Datsun parts reseller. Lots of good reviews, but everywhere I looked on this engine, shortcuts were made everywhere. Who rebuilds an engine, and you don’t redeck the block??
[Editor note: While our friend Stu may not have known, those of you in the Z community for any length of time have undoubtedly read the nightmare stories about Datsun Parts LLC and their shoddy engines/heads. A quick search for “Datsun Parts LLC engine problems” will confirm our position. Stu was much more patient than we would have been.]
Sulking, and ready to throw in the towel, I called it a night for several weeks. The Banzai Runner sat like a boat anchor in my garage. What do I do… Do I give up? Call it quits? All this hard work for nothing? Thousands of dollars spent down the drain? Where do I go from here?
Discussed it in detail with my wife, and she understood what was going on. After a long discussion, and a call back to Dave, I was again pulling out the engine, and sending everything back to him. I begged Dave to take pity on me and work with me if he could. I wasn’t expecting much, but we worked out a plan. I shipped the block and head back to him for him to do his work.
This is NOT where I expected to be at this point in the build – Despite careful planning and execution, what a mess this has turned out to be.
Tough decisions to come – Join me for the next episode!
Questions about this build? Comments? Discussion here: Widebody 280Z discussion
My total budget for this project, including purchase, was $15,000. I planned on doing 98% of the work myself, and only subbing out work on occasion where needed. I hoped to make good use of the budget by making sound decisions going forward. Lots of research was done, tracking spreadsheets, evaluating, and shopping costs from all over the place – even across the sea from Japan, to make sure I got the best deals possible. Research into L28 blocks, heads, head flow characteristics, and other info helped me nail down how I wanted this to turn out. However, as any hot rodder knows, parts sometimes don’t fit, and sometimes your ideas just don’t always work out. This increases cost, and puts a strain on the entire project.
Looking at other builds online helped me find inspiration for where I wanted to take this car. I studied the “Kuro Z”, “Sakura Z”, “Imai Works 260Z”, “Yuta Z”, “Vengeance Z” and many many more that maybe have no names, but are equally impressive. I looked at everything from car colors, wheels, body modifications, interior and other areas to decide what I was trying to accomplish. Crazy bosozoku cars, shakotan cars, race cars, street cars, everything – still soaking up knowledge and ideas.
Eventually I settled on wanting an old school Japanese muscle car – on a reasonable budget, of course. I would stick with the stock engine, go down the triple-Weber route, headers, exhaust, and other go-fast bits to try and make everything fit within my budget at that time. Weight reduction would dictate removal of the bumpers, some fiberglass bits, and removal of other unnecessary bits no longer needed (AC, heater, etc) to make it lightweight. I wanted this car to be so unique and different, but in a cool way, that it would get known. Kinda vain, I know, but I was determined to put out a cool car that would spark conversation – either good or bad – within the community.
Of course, every great project needs a name to go down this route. Any of you know Eleanor? Of course you do. What about Christine? Yep, you know that one too… This is why it would need a name going forward…. “BanZai Runner” was the name I eventually came up with.
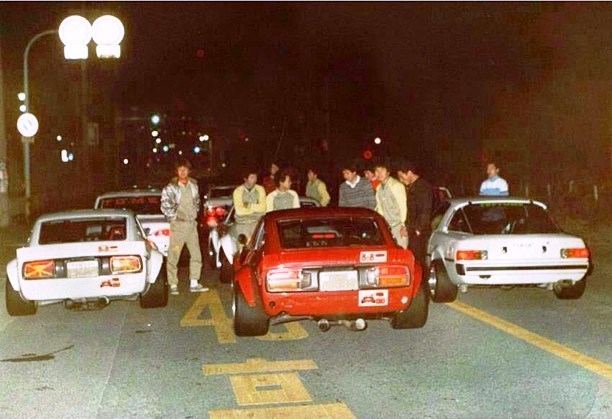
Eventually this picture made its way to me one night. An old Polaroid picture, taken in Japan, year unknown. Fender mirrors, wide rear tires, flares… perfect, just what I was looking for.
Once some bigger problems started happening, the budget got thrown for a loop and put the entire project into jeopardy. I was literally at a crossroads with my wife with this love/hate relationship that had been building. Talking to several members in the community, as well as my father-in-law, and friends… it was decided I would keep trudging along… somehow I would find a way to complete this car, and make it everything I wanted it to be.
Engine problems threaten to sideline the Banzai Runner for good…
Questions about this build? Comments? Discussion here: Widebody 280Z discussion
With a plan in place, and the rest of the project more or less mapped out, it was time to make sure it could move under its own power. After getting the car home I took a few very easy drives, as suggested with the break-in instructions. Right away, I started to have some issues. After several drives to seat the rings, I took a very long drive around the valley. On the way home, I decided to really get the RPM’s up which I had never done before. At 6000 RPMs, I heard a very LOUD pop sound, the car ran like crap, and died. I coasted off the freeway onto the shoulder, and had to call a tow truck home. I had no idea what happened, and I figured I blew up my engine some how.
Got the car home, and it started up! But… it definitely wasn’t running right. I drove it a bit out of the garage, and decided to take a full look at it. The first thing I did was pull the valve cover off. What I found wasn’t good.
I’m surprised this car even ran! It was basically running on 3 cylinders! Fixed and put back together. Then it happened again.
Then it happened a THIRD time, except this time in the #6 cylinder, on one of the valves, the retainer split. No valves dropped into the engine bay, thank goodness.
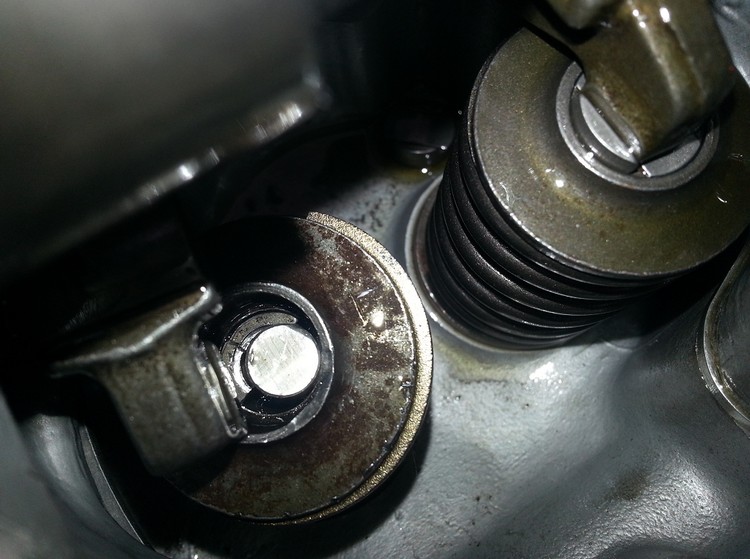
I even had to invest in a spring compressor tool so I could work on this stuff without bothering other people. Eventually all the springs were replaced with Schneider doubles hylift springs. But… again it happened.
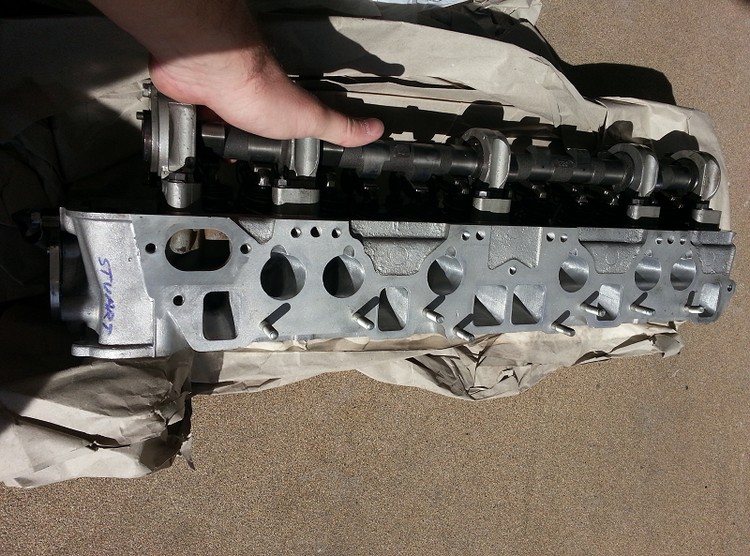
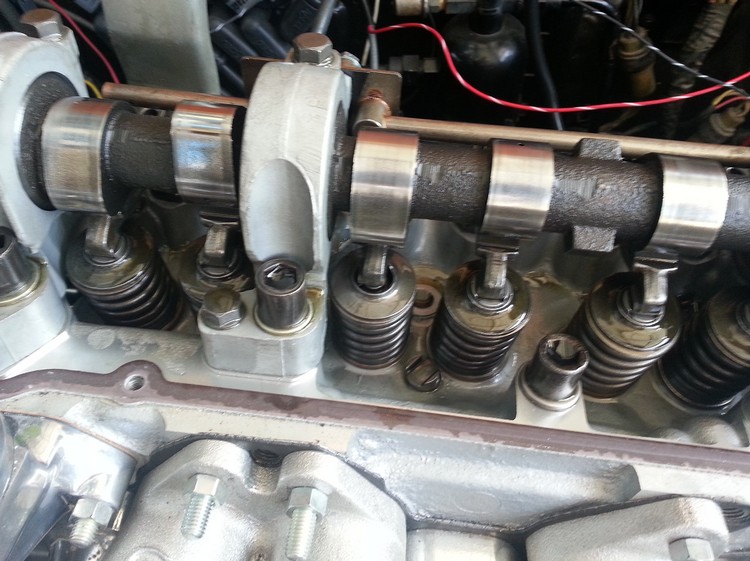
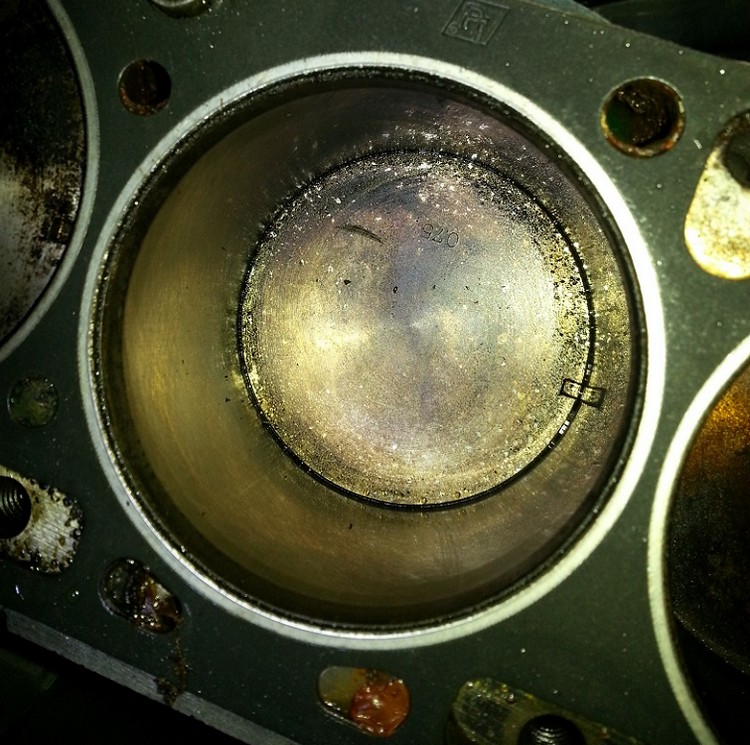
At this point I was so frustrated – it was clear that something was terribly wrong with this engine. After talking to a few people in the community about repair, I eventually made my way to Dave Rebello. I told him what was happening and asked if he could fit it in his schedule to get it fixed. It was prime race season now, so he was quite busy, but he said to ship it on over to him. I bought the timing chain holder and removed the head. Pulling the head, the valves definitely had touched the cylinder heads. Number 2, 3 and 6 pistons had exhaust marks, and number 4 and 5 had intake marks.
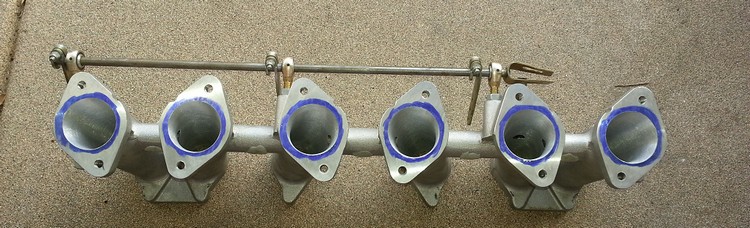
I also learned this was NOT an 89mm piston as well. Needless to say I was pretty pissed about this. I shipped the head off to Rebello and waited for word back. I decided, since he had it, to do a full street port, and add a cam with a good street compression ratio. I also sent the Cannon intake manifold to him so he could port it as well.
Special delivery, and the Banzai Runner budget takes a huge hit…
Questions about this build? Comments? Discussion here: Widebody 280Z discussion
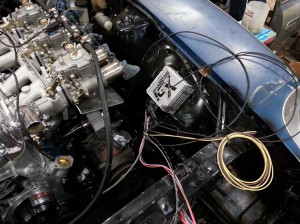
With the engine in the bay, the wiring was up next on the list.


Remember how I mentioned that this car sat for 12 years? Well guess what? It sat with a full tank of gas! It was the nastiest stuff I have ever had to deal with. Terrible, terrible stuff…. With the gas tank dropped, I began to inspect it. It was not looking good at all.
I needed to come up with some options on what I was going to do. Find a replacement? Fuel cell? Clean it? Calculating costs of a fuel cell quickly exceeded a budget that didn’t have much room to afford these kinds of problems. But there was no way I was starting this engine until the fuel lines were all taken care of, including the tank. Postings were placed on all the usual spots, looking for a used early 1976 fuel tank – but this resulted in nothing. So I started looking locally at some places that could clean out the tank. “Commercial Radiator Service” or “CRS” here in town said they could help me out. They focus mainly on industrial heavy machinery. Had a quick look of the place, and left the tank with them. A week later I was told to come get it. The foreman said it was one of his more difficult jobs his guys had to do, but it came back pretty! The fuel lines were blown out with compressed air, and cycled through with solvent on a small pump until it ran clear. Unfortunately, no pics of the restored tank, but it looked like new!
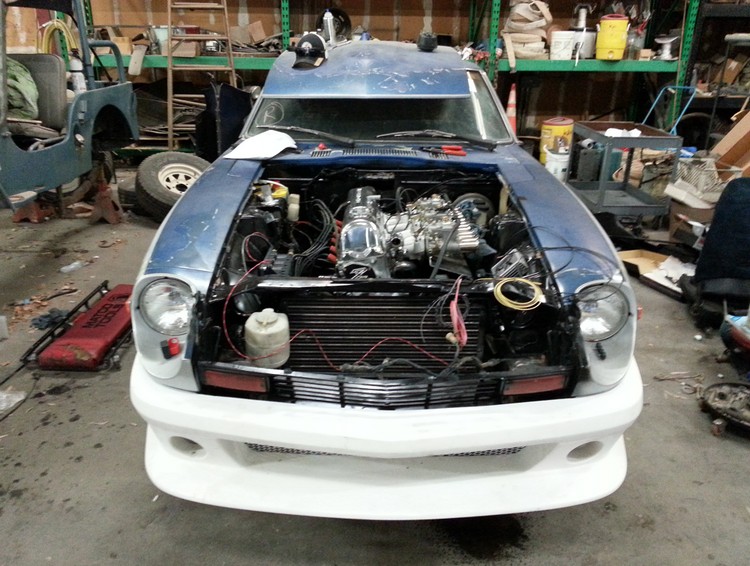
With everything wired up, and a clean fuel system, it was time to see if we could get this started… With the new setup, setting the timing was a cinch!
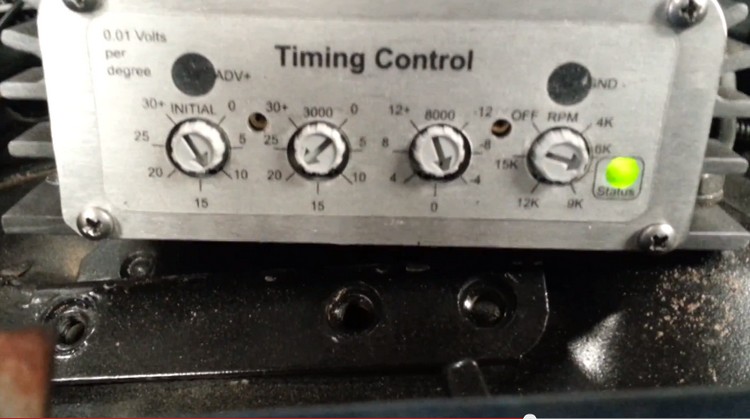 Initial startup to 3000 rpm (idle), then you add initial + 3000 rpm to get your “all in”. I was shooting for about 32-34 degrees total timing. The built-in rev limiter would ensure that I wouldn’t kill the engine accidentally!
It took some fiddling with the carbs a bit… but eventually…. [NOTE: Some NSFW language]
No muffler, no exhaust… just an open header – no tune or carb sync, and stock jets out of the box.
I cut the hole in the hood to mount the Datsun Competition hood scoop. There was some fair bit of history around this part – It was actually a dealer option down here in the Southwest on cars with SU carburetors that experienced vapor lock. It worked so well, that the Datsun Competition department picked it up as a performance modification. Remember that hot AZ heat I’ve been talking about? This will ensure that extra heat has a route out of the engine bay.

At this point, it was time to bring the Z home with me.
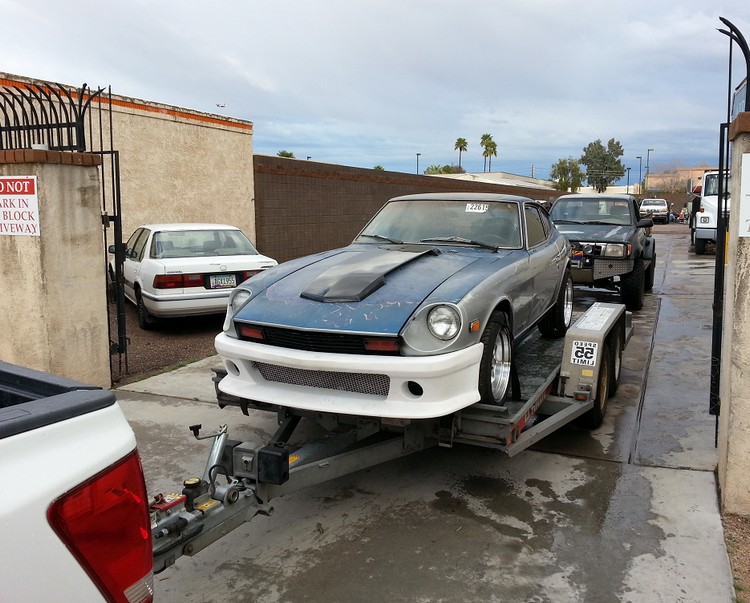
With the car now heading home with me, I could continue to work on it after hours, weekends and whenever I needed to, in my own garage. 14 weeks was spent to get to this point. However, it was during this process, my wife and I found out we were going to be expecting our first child! As if the project wasn’t going fast already, I needed to get this wrapped up sooner than later. My wife was now getting anxious with all the money I had been spending on this project, and with the car not complete, it was weighing heavy on me as well.
A pause to make important decisions – Would the Banzai Runner continue?
Questions about this build? Comments? Discussion here: Widebody 280Z discussion
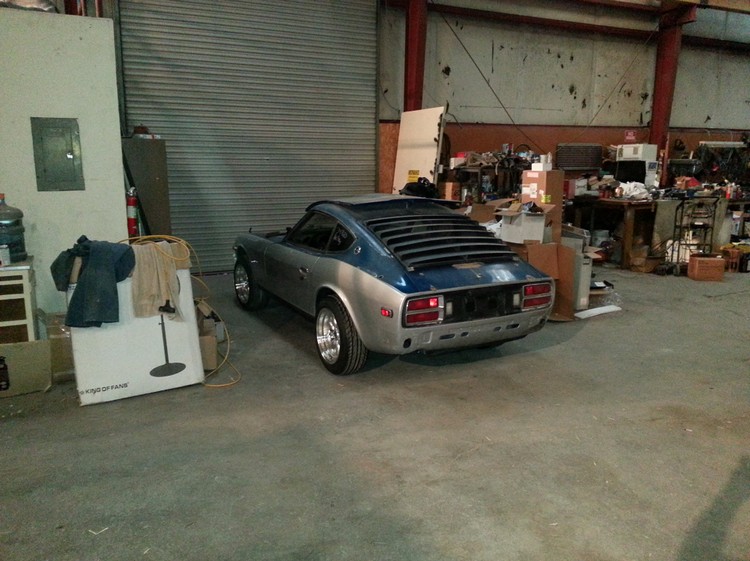
With the transmission all buttoned up, at this point, the car was ready to be moved from outside under my makeshift tent, into the garage to have the motor installed. I picked up a set of Yokohama S-Drive tires in 205/55/16 and had them mounted on some 16×8 XXR 513 wheels. This was a temporary setup until I could find what I was really after… Wheel and tire package ran me $800 out the door. Thanksgiving Black Friday deals were to be had! But a problem came up when adding the new wheels that warranted closer inspection.
This was not a normal droop on the rear wheel. Turns out the rear strut on both sides tore through the rubber mount up in the strut tower. I spent a good 3 days looking for this replacement part, but it was no longer available. Hitting up all the normal spots, I was given a super secret name… “Z Specialties” up in Washington. After some talking, the owner assured me some good rubber from a wet climate like Washington would last me several years of good use if taken care of properly. A deal was struck for a used set off one of his parts cars, the parts were on their way.
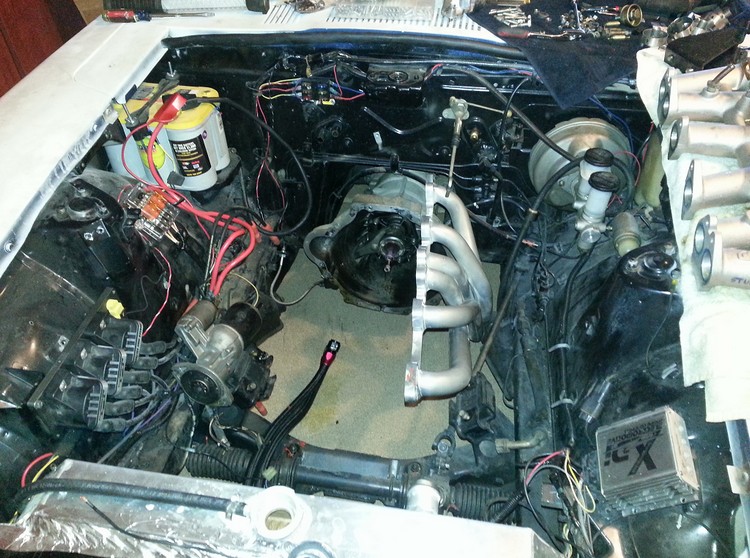
The next day I started working on getting the engine put together.
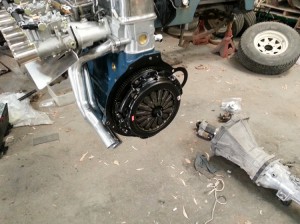
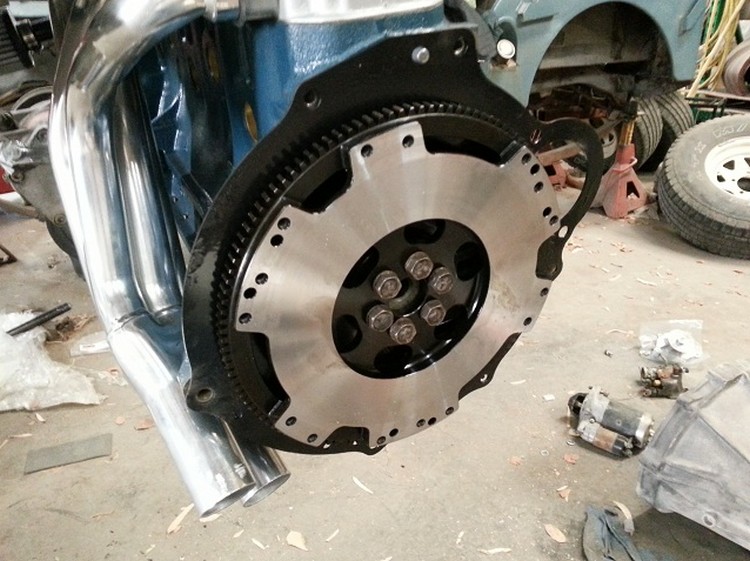
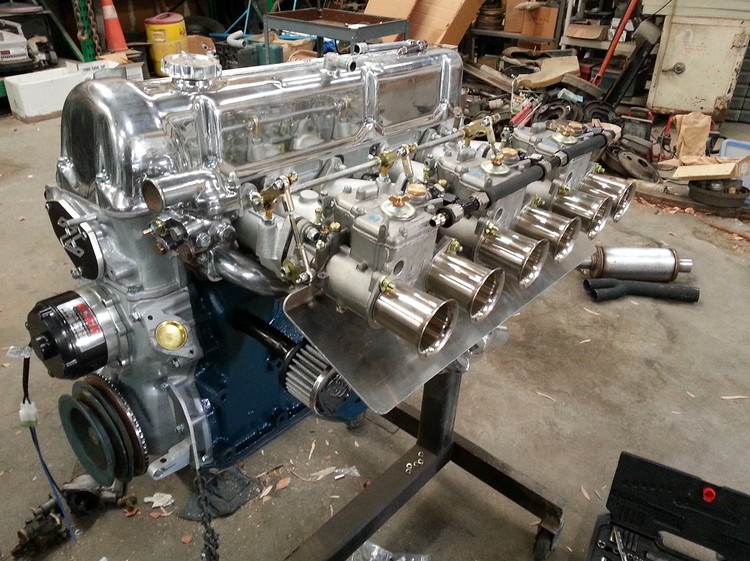
Competition Clutch Stage 2 clutch and lightweight flywheel. Didn’t want anything too heavy, but the car still needed to be “streetable.”
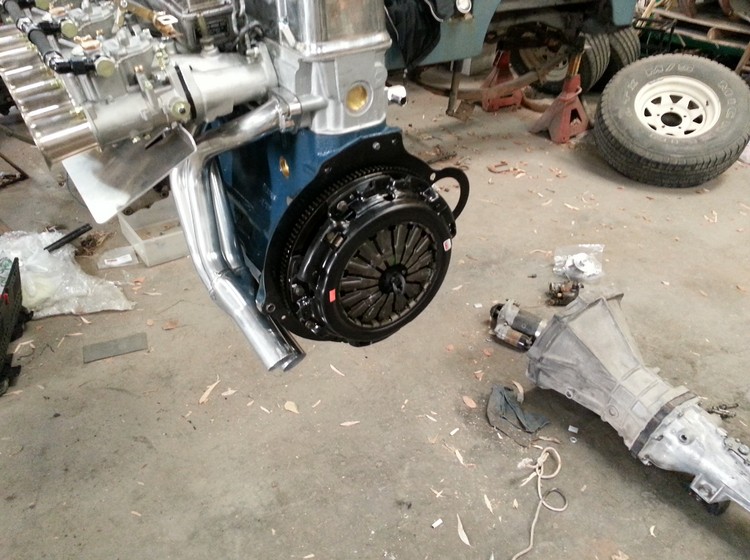
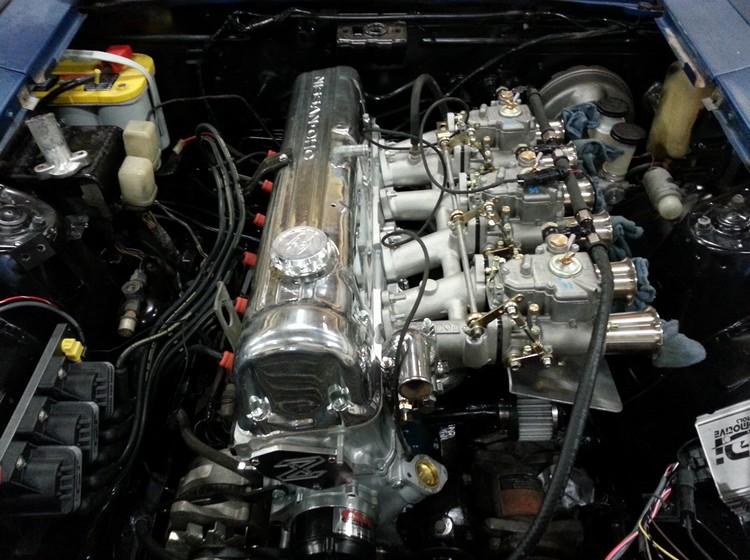
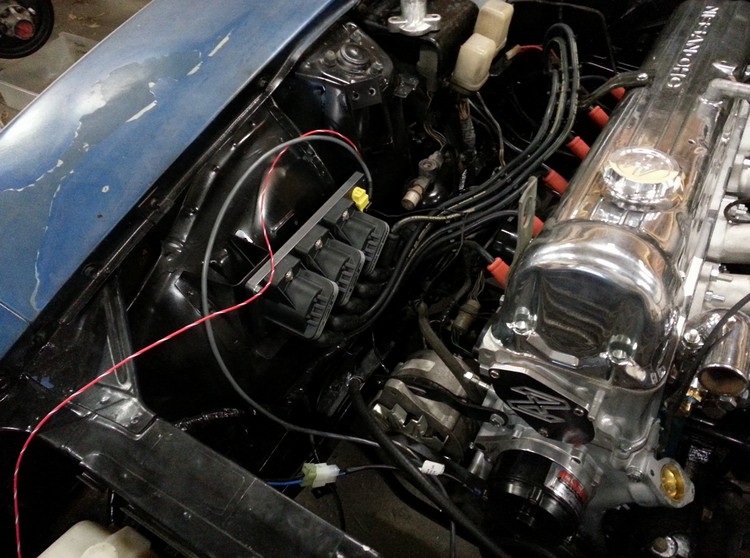
Weber DCOE45 carbs added, along with the MSA 6-2-1 coated header, 2.5″ diameter. Some dress up bits, as well as the CSR electric water pump and trigger wheel were mounted on the stock crank pulley. The bracket for the magnetic pickup has also been mounted. The heat shield came from z car customs jdm (zccjdm.com) It caused problems and had to be removed. I couldn’t get this to seat properly no matter what I did with the carb. It uses the bolts which mount the carbs to the Cannon intake to hold it in place. For someone looking for a perfect seal, it wasn’t going to be a very good idea for the long term. I later sourced a real JDM heat shield and bits which worked perfectly. It doesn’t require the mounting bolts for the carb to hold the piece in place.
All assembled and ready to get installed! At the time, I was going to run air conditioning. However, it has since been removed. I am sometimes regretting that being in AZ, but I decided it would be a fun car to drive when we have nice weather. I’m sure any dealerships would agree. Similar to how people in the midwest or east coast pack their Z away for the winter, I pack mine away during the summer months when it’s over 100 degrees. I removed the AC system, as I was looking for more weight savings. I still have all the parts, so it may get added later.
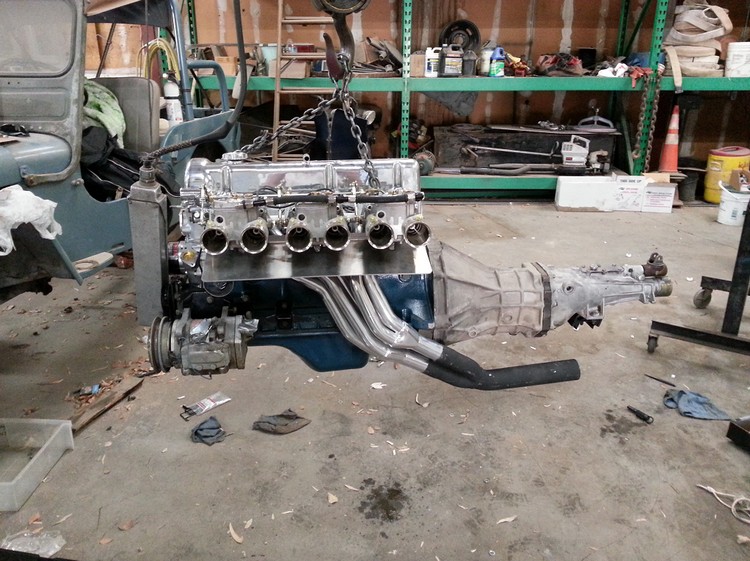
Always handy when someone has a crane in their garage… Getting ready to put the engine in.
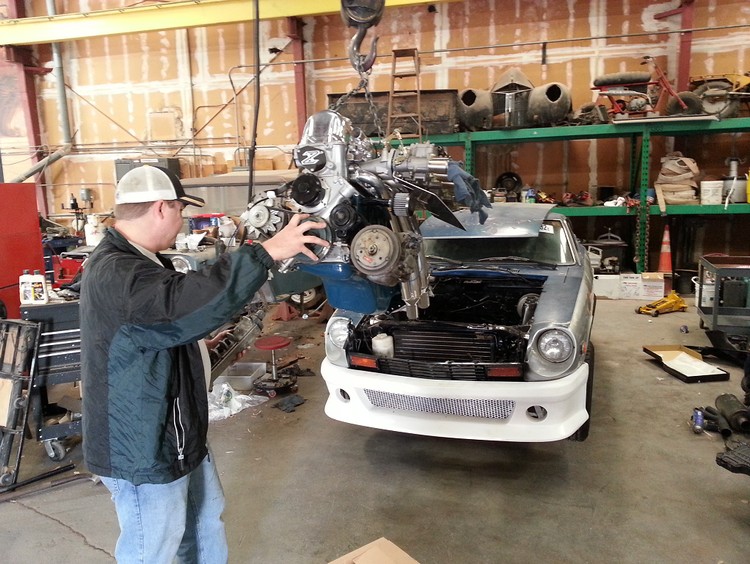
After some wrangling, the engine was in! Now the wiring can begin.
In the next episode, we’ll check out the wiring, and see if it’ll fire up for the first time…
Questions about this build? Comments? Discussion here: Widebody 280Z discussion
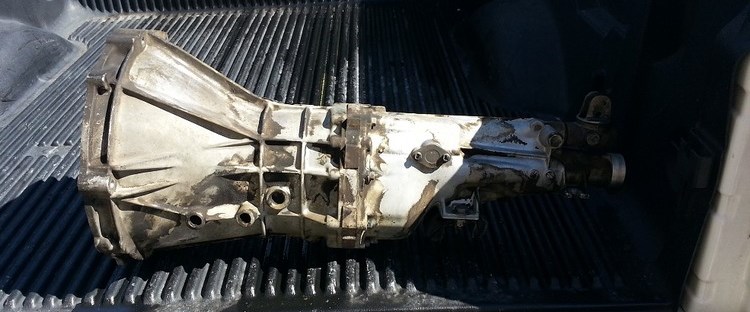
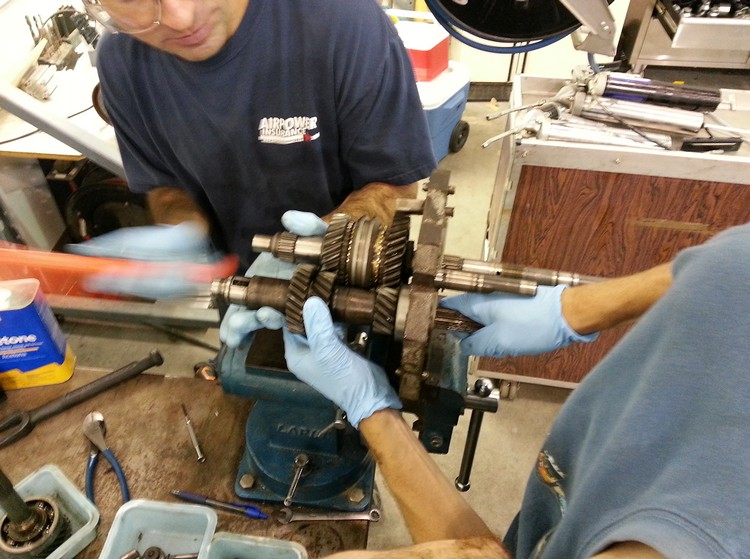
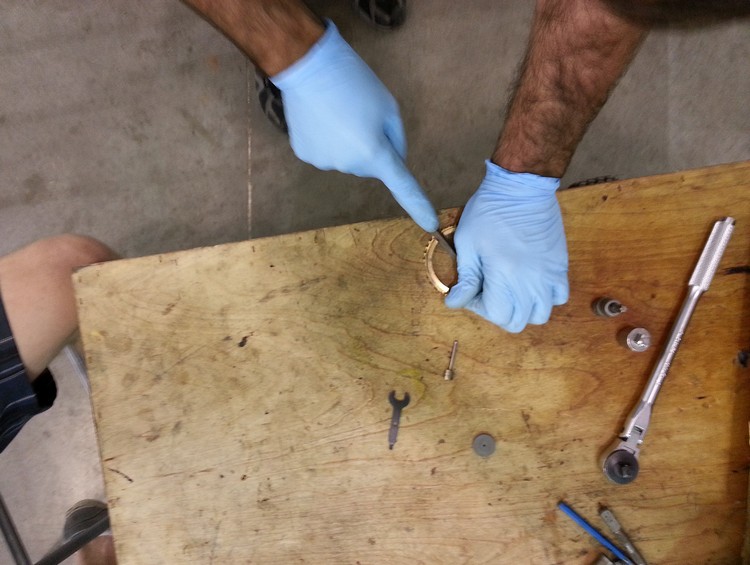
With the interior in nice condition, it was time to get back into the drivetrain. I sourced a close ratio 5 speed transmission to swap in place of the 4 speed. It was a Craigslist find for $120. Not knowing what the condition was like, I got “vanmansam” and “tjyak50” off Desert Datsuns (local Datsun club) to help with a rebuild. TJ was racing his Z, and had already rebuilt his a few times with some ‘secret sauce’ – which we would be including in my rebuild. I bought all new synchros and bearings from nissanpartszone.com. I think it was about another $300 in parts, plus beer and pizza to do the tear down and rebuild on the 5 speed. Even though a lot of the parts didn’t need to be replaced, I opted to have it done.
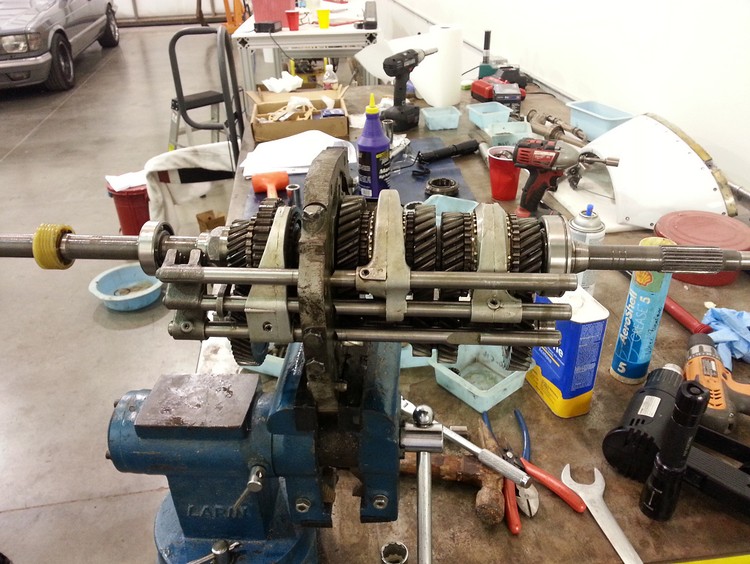
I can’t even begin to tell you what all we did here, except for the complete tear down of the transmission.

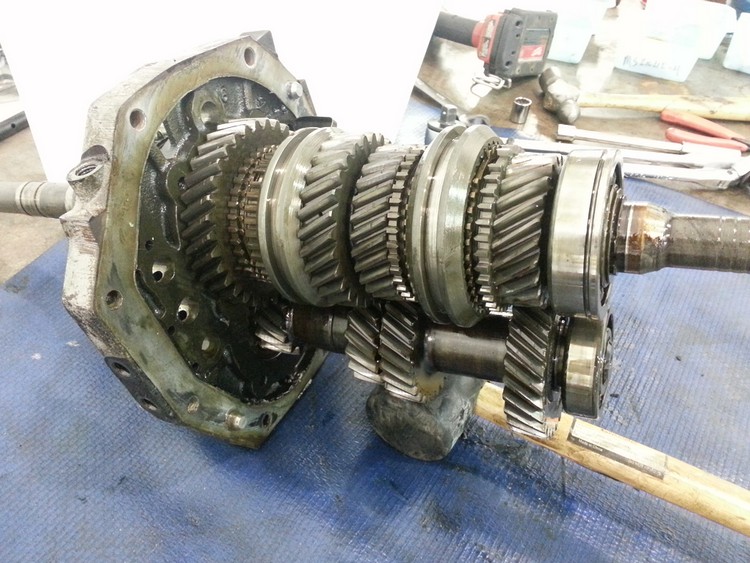
This is part of the ‘secret sauce.’ New synchros ground down a couple thousandths. TJ has it well documented as solving his ‘crunching’ when shifting at 7000 RPM, or even popping out of gear. The tricks he learned at the time (which have since grown) were applied to my transmission.
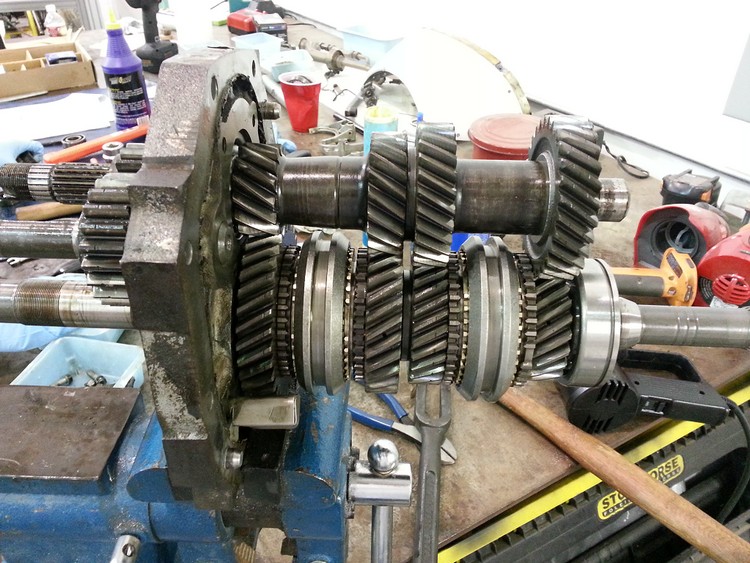
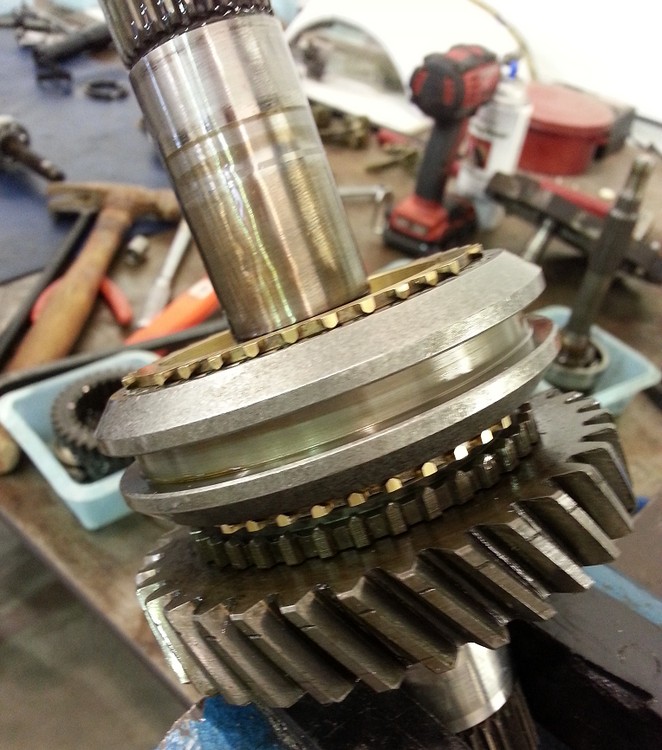
All back together. The rods move the collars. You can see the brass synchros between the gears.
In Part 6, we’ll get back to the engine installation!
Questions about this build? Comments? Discussion here: Widebody 280Z discussion
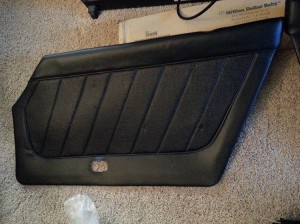
With all the effort in the mechanical components of late, we needed to take a break and address some of the interior needs. The original interior doors were cut up pretty badly from the previous owner. From the looks of it, they had a 6×9 speaker of some sort in the door, with tweeters high up on the door. I opted to go out and find new door cards, and with a kit from zcarsource, I was able to recover the new interior panels to like new status.
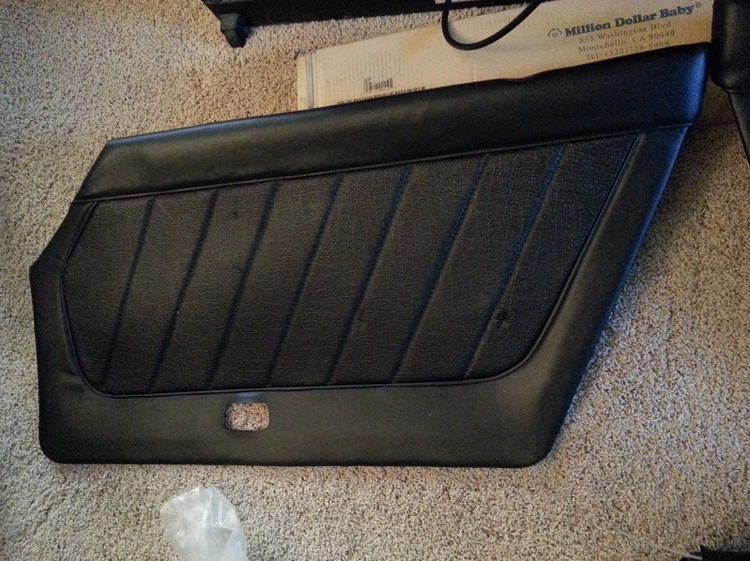
There was a problem however… My 280Z wasnt just a 280Z, it was an extremely early model. This was a hard lesson for me to learn as I was trying not to spend money twice. The door card would not fit because of the lock placement. Do I drill a hole, or preserve this work and sell it? I opted for the second option.
I sourced new door cards, and bought another kit to redo the door cards after selling the others. However, they were in pretty good condition. Due to so many things going on, I just put those door cards on, and haven’t recovered them yet. This would become the first of many small issues leading to some major headaches in some other areas of this build.
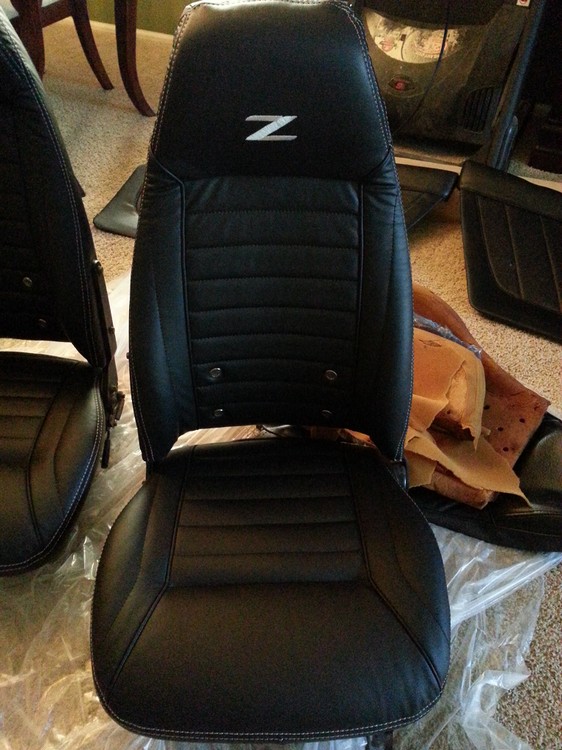
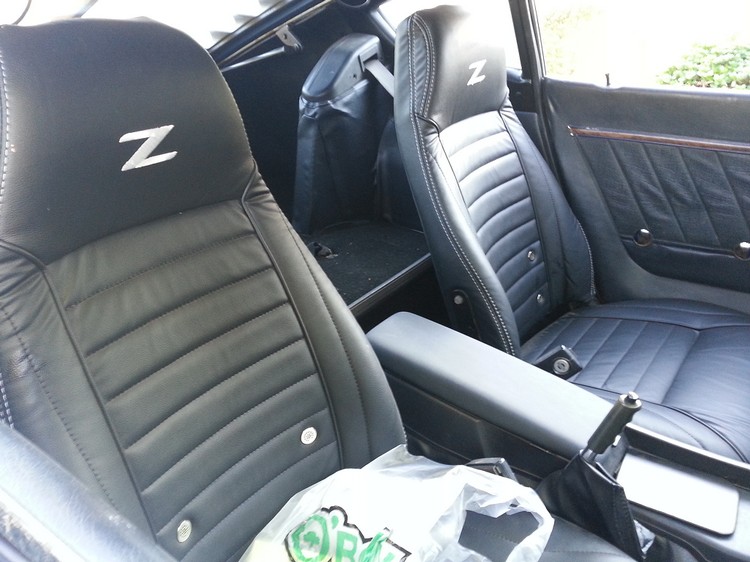
The seats turned out awesome in my opinion. I bought a leather kit from one of our sponsors here, Interior Innovations. The deal included free embroidery, as well as any color stitching you wanted. I bought 240Z foam inserts from the z store, and wrangled with the seats until I gave up. I decided to have the pros handle it and went to a shop to have them do it. I don’t think I could have done it any better.
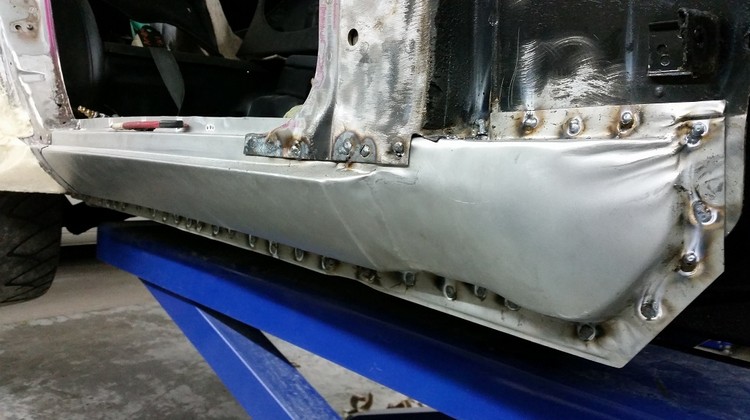
As you can see the passenger side rocker panel was totally destroyed. A new one would need to be put into place no doubt about it.
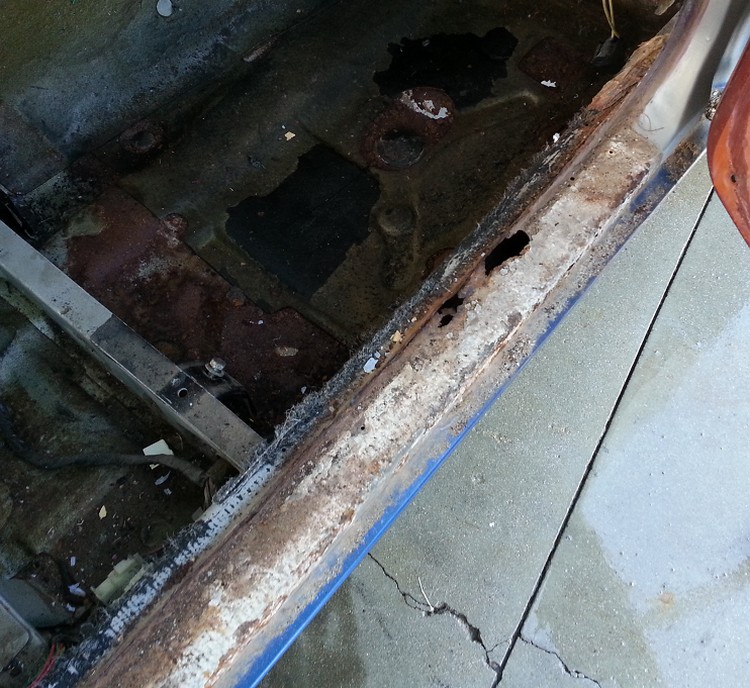
This is one part of the project I hope to never do again. But I learned so much during this experience, it’s invaluable now. I never knew how these cars were pieced together. It was interesting seeing how this car all goes together with the various pieces. Basically there are spot welds about every inch or so. You use a special drill bit that drills out around the weld. You do this all the way around, and then beat the panel until it comes off. You then grind down all the existing spot welds, and punch the new part every inch or so. Fit it into place, and then spot weld it back in. I followed up with seam sealer and hammered down the edges around it to create a clean fresh look. The seam sealer filled in any gaps between the metal and created a sealed finish on the part. It was then sprayed with a chemical to protect it from future rust, as well as painted. Interesting enough, when this was put in, it also fixed the passenger side door which had some fitment issues no one could fix.
Based off the passenger side damage from rust, I patched a few holes in the floor pan rather than replacing both sides. Thinking about it now, I should have, but it should be fine for a long time. Floors were prepped, treated and then I covered the entire floor and doors with sound deadening / heat-blocking insulation.
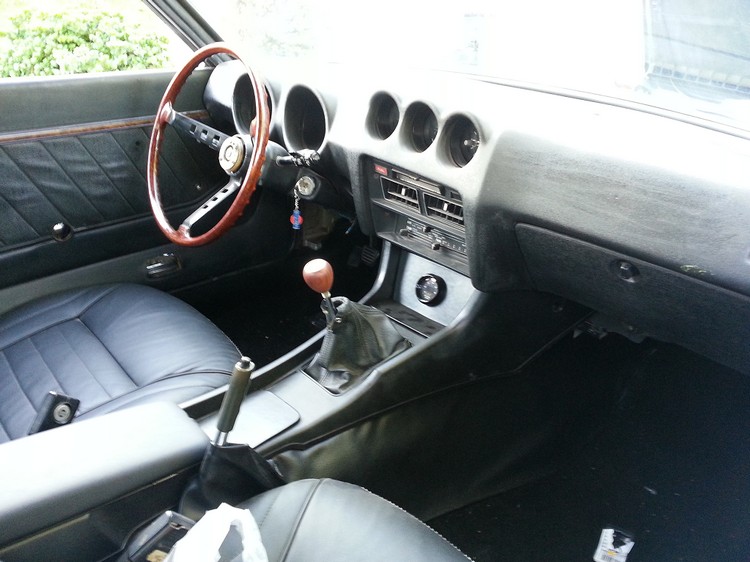
The dash was freshened with a new full face dash cap. I wanted the vintage look, so I kept the original wood grain steering wheel. It is quite thin compared to normal steering wheels. A new center console was also sourced.
With the bulk of the interior work completed for now, it was time to dig back into the mechanical bits…
Stay tuned – Up next, the Banzai Runner gets a 5-speed!
Questions about this build? Comments? Discussion here: Widebody 280Z discussion
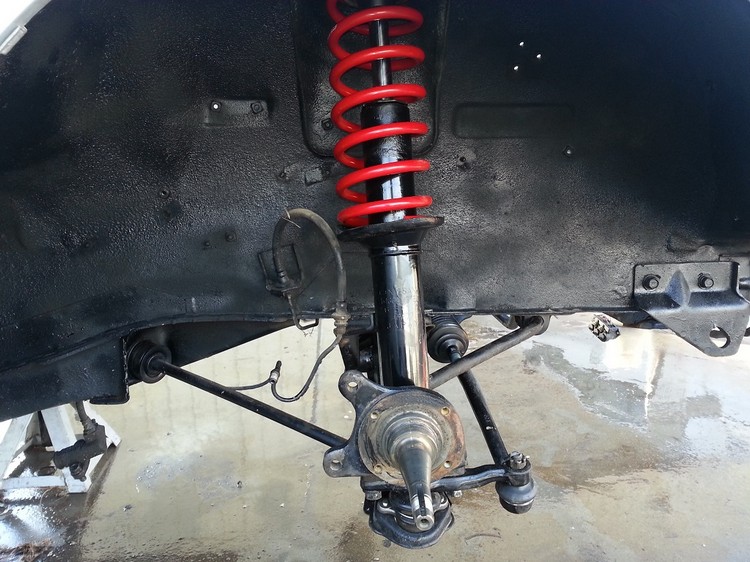
All new suspension components, bushings and bearings would be installed. Found a set of Tokico Adjustable Illuminas on Amazon before they went unavailable.
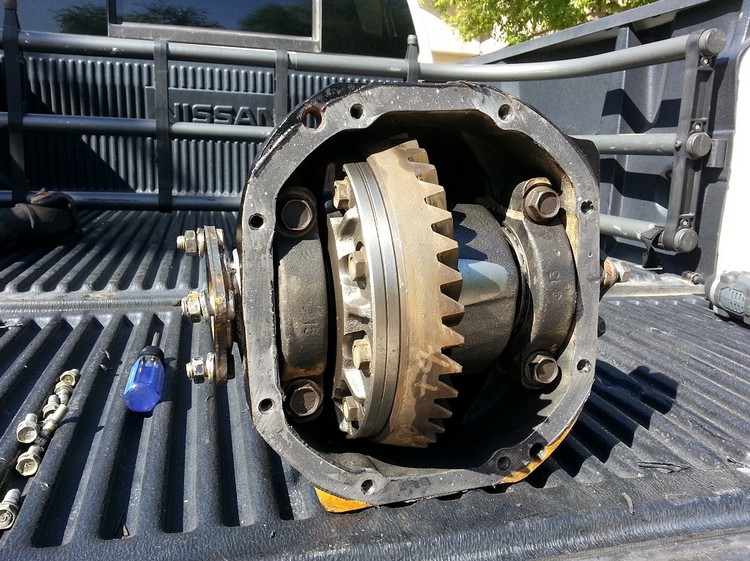
Got the rear diff pulled in about half a day. I definitely needed some help from my father in law on this one. We pulled it out all in one piece.

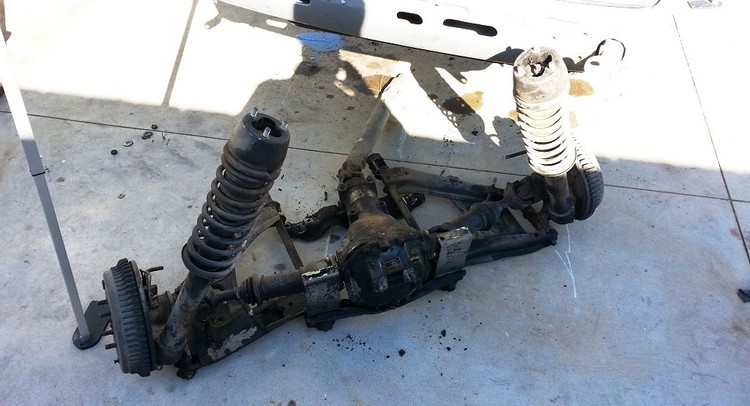
One thing I knew for sure I wanted to do was get rid of the drums on the rear. So I went with getting a brake conversion kit using the maxima calipers so I could retain the use of the parking brake. Getting the stub axles pulled apart was not an easy task even when it was out of the car. I should have just cut the brake dust shield, but I pulled it all apart. A hard lesson learned. I found my rear end ratio was 3.54 R200. I did some research and was able to source a 3.91 R200 differential from an 1982 automatic turbo Z here in town.
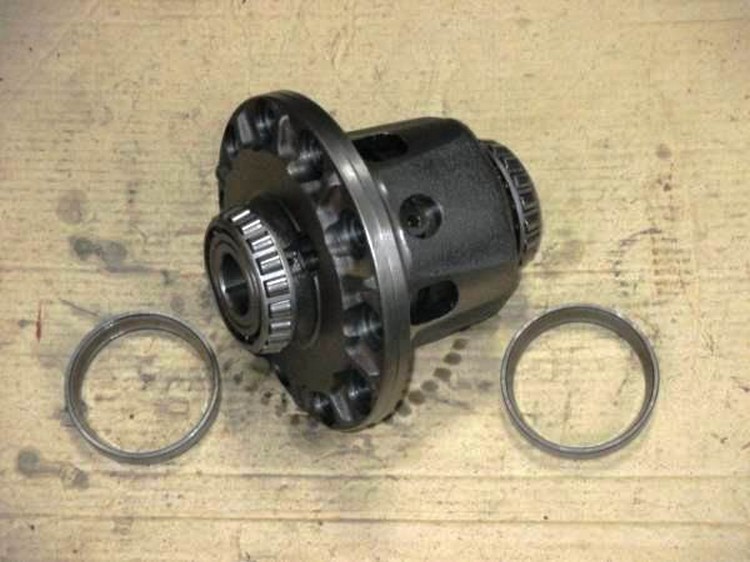
Knowing I wanted an LSD, I went on the search to find one. I read about several that are available, but some had me worried about reviews I read like the OBX, and others cost more than I wanted to spend like Quaife. I ended up finding a good compromise with a genuine NISMO 2 WAY 38420-RS660 for $350. I took the new LSD and R200 down to Differential Specialists here in town, and they put it together for me for 70$. They did the bushing conversion so it would fit. The ring gear was 10mm, while the nismo lsd was 12mm. It would need bushings to make it fit correctly. The shop used 4 bushings to keep the ring gear centered, and then the rest would not be, but would provide for clamping force as needed. It was filled up with Redline MT90 and Redline LSD modifier.
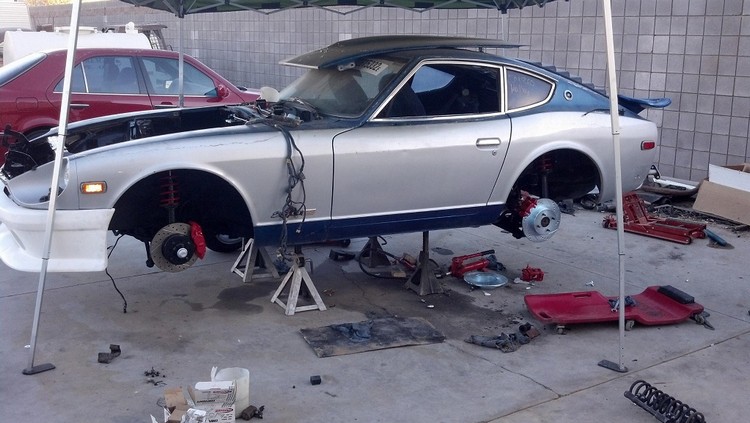
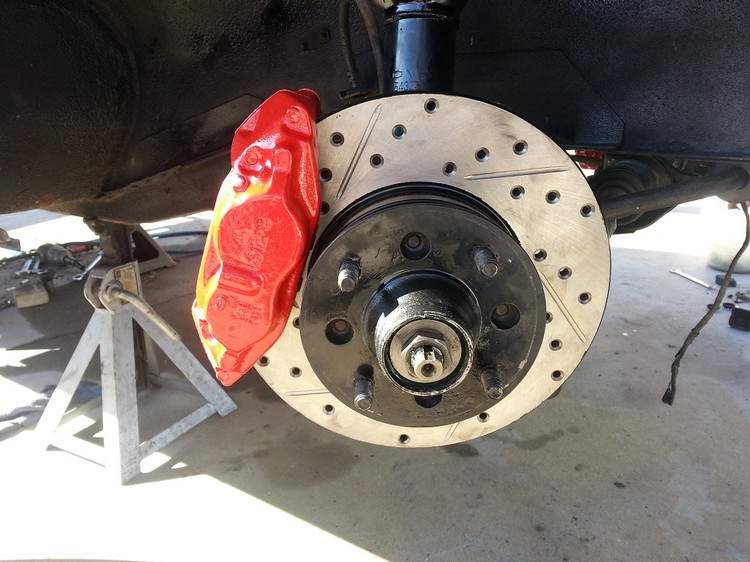
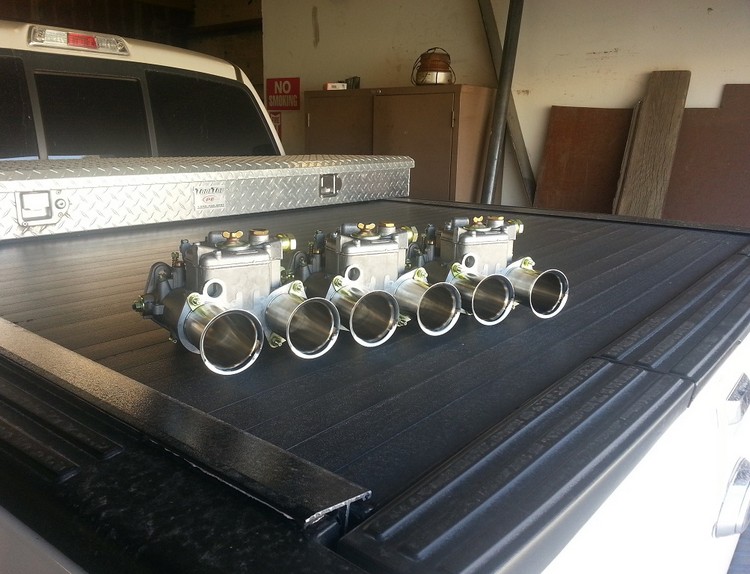
At this point I knew I wanted to keep with the L28 engine, but have it beefed up a bit. I wanted ‘old school cool,’ so I opted to go the triple Weber route on some kind of modified L28. I found an Ebay seller selling a longblock for $3200. High compression, P90 head, and F54 block. Oversized pistons as well. Everything on paper looked great, so I did the buy it now and waited for it to come in. In the meantime, I was able to get the rest of the suspension put into the car along with the MSA Type 3 air dam. I opted for the big brake kit up front using the well-known toyota 4×4 calipers. I was a bit surprised how easily they went in compared to everything else. Slotted and drilled rotors on all four corners were another performance modification I wanted as I planned to track this car on occasion.


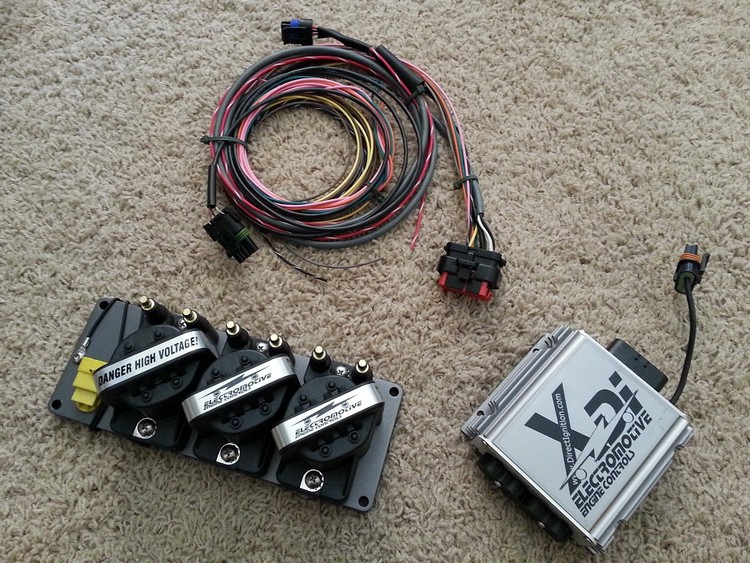
More parts started arriving during the week… New ignition system – crank-fired. A more modern ignition system that would remove the need for a distributor, sourced from TopEnd Performance.
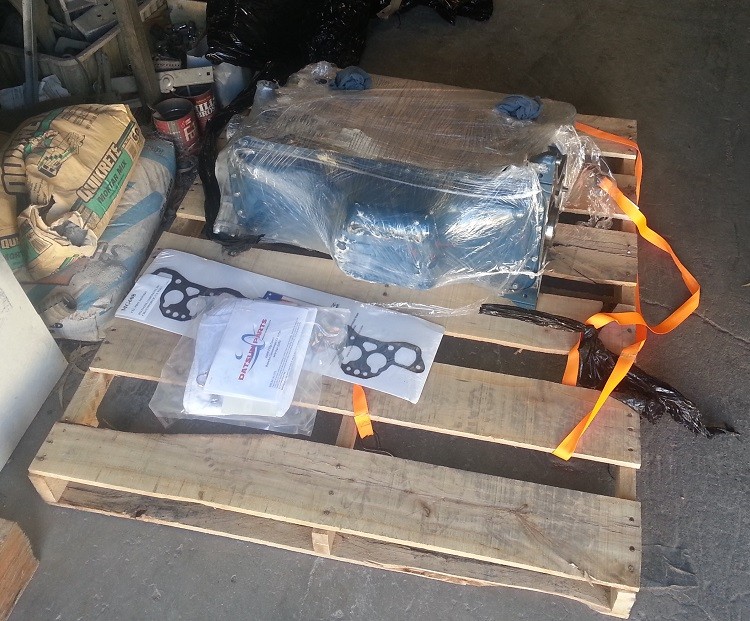
New engine showed up:
…as well as the triple Weber 45 DCOE carburetors from TopEnd Performance.
Next up – We take a break from the mechanical upgrades and tackles some interior work.
Thanks for following along so far! Questions about this build? Comments? Discussion here: Widebody 280Z discussion
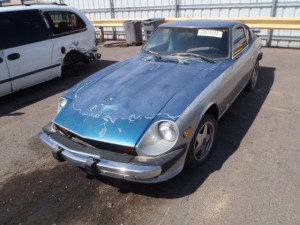
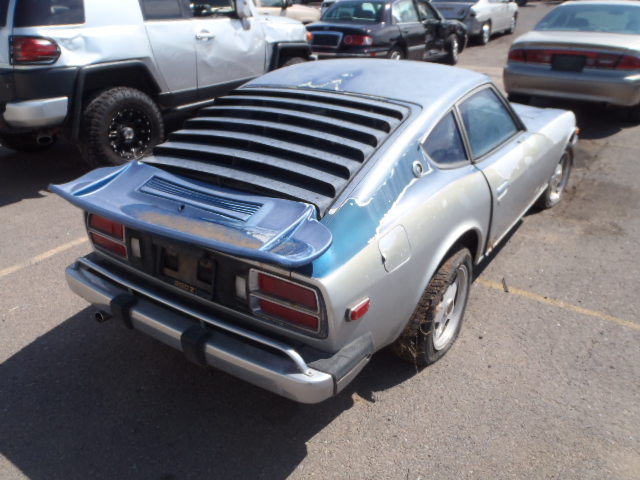
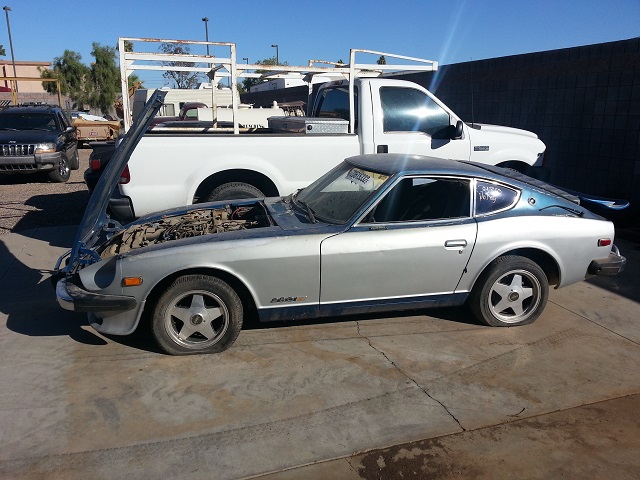
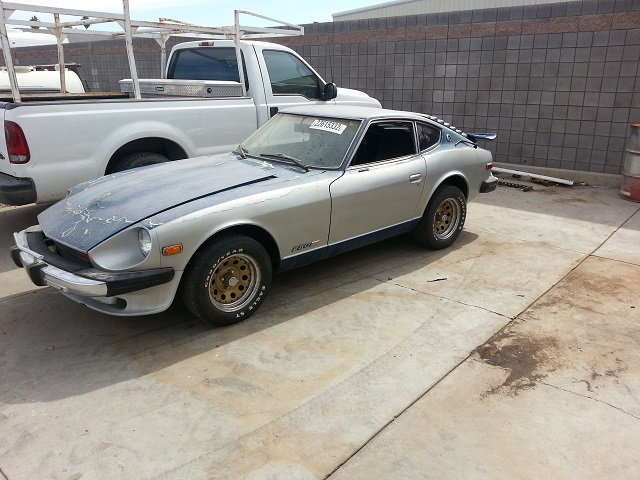
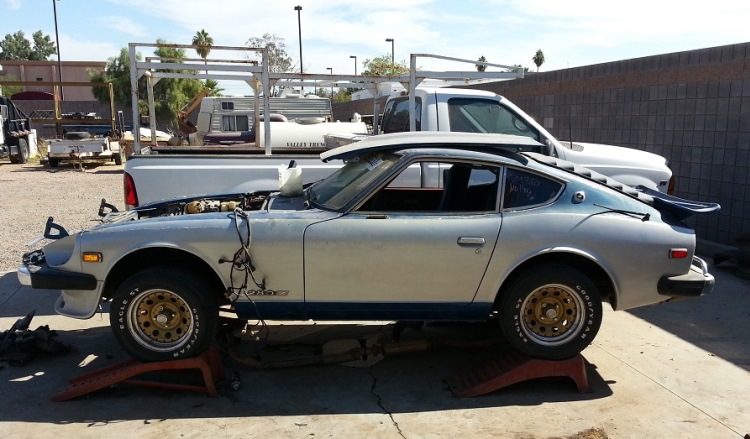
I found this 1976 280Z from a place called Copart here in town in 2013. Oddly it was painted the exact same way as my ZX. Original light sky blue with dark blue on top and bottom. Part of me wondered if the same guy may have owned this car. Also I saw it as a sign that I needed to get this car! I have never seen this paint scheme before other than on the ’79 I had. This car was listed as a donation car, and that all proceeds went to a foundation for kids. I paid $800, sight unseen, just pictures on the internet. I got extremely lucky on this, as I’m sure lots of people are wondering about rust. It’s always been an Arizona car. Sure, for a 40 year old car, there is going to be some rust, but turns out it wasn’t bad at all. A little up front by the headlights as normal. But the passenger side rocker panel and door were completely rusted out which would be fairly easy to replace, and a little back behind the rear tires on both sides.
Pictures of the 280Z at the auction lot:

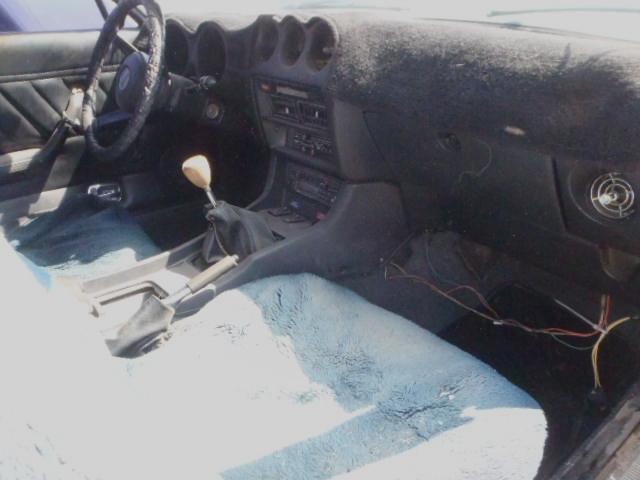
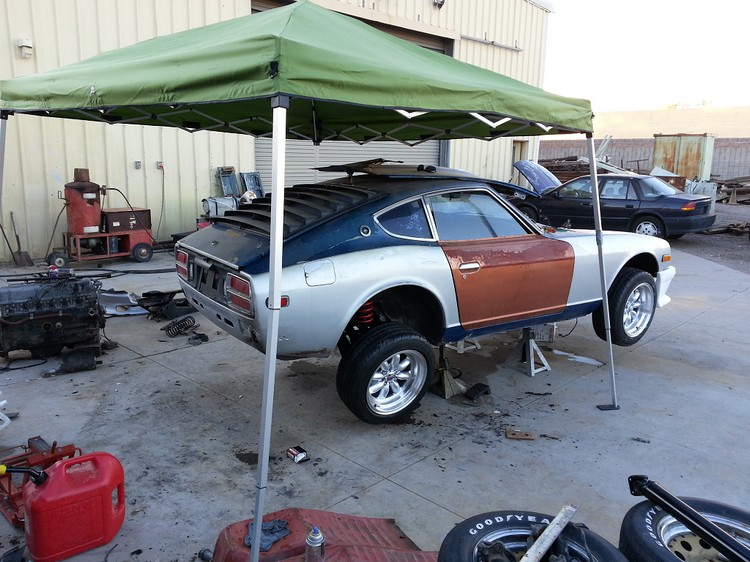
Pictures of the 280Z finally at my father in laws shop, and found some new wheels on craigslist that will help with moving the car around as the restoration progresses:
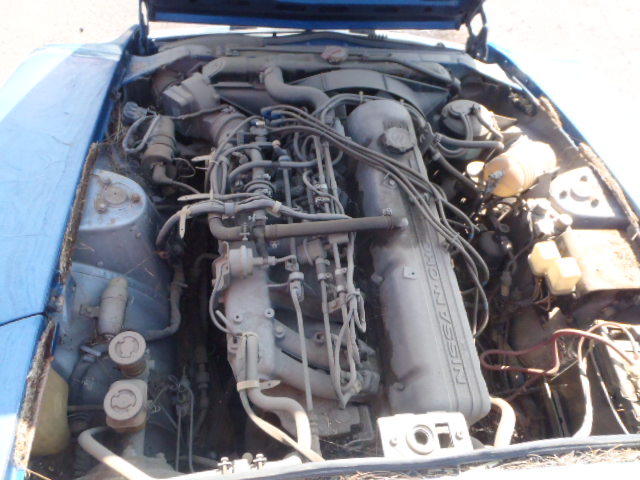
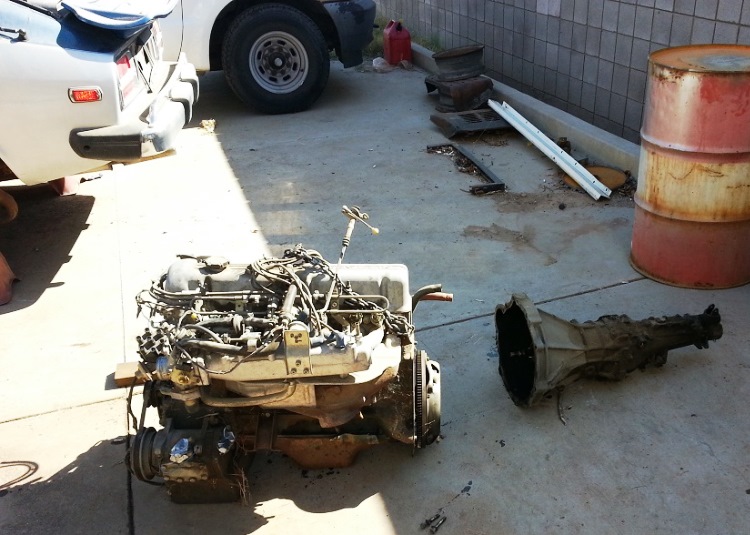
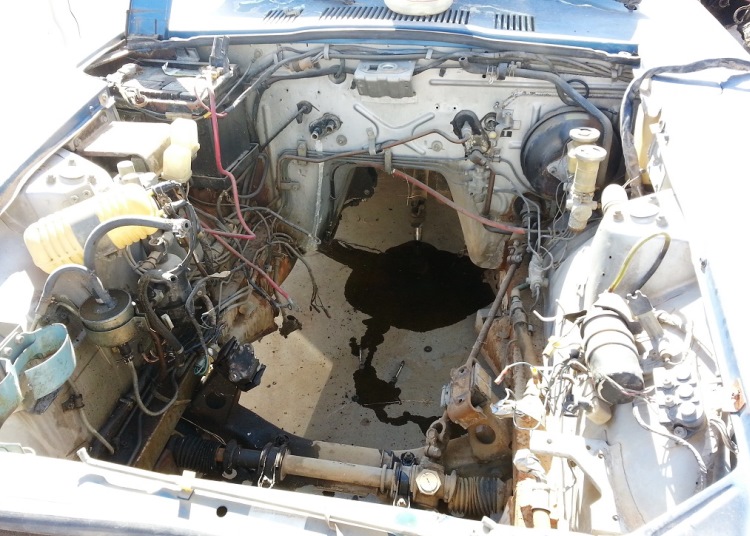
So the first operation of business was to get the old engine out. Got it pulled out fairly quickly and realized the engine was done for. Coolant had sat in the engine, and rotted away the passages over the last 12yrs. It was brittle like paper, and crumbled without any effort.
A lot of the rust you see, is just surface rust. It all cleaned up very nicely with minimal effort. The battery tray had no problems whatsoever – always a good sign!
The hard part was what to do as a replacement engine. So many choices to chose from… V8, L6, RB, SR, KA… lots of research was done at this point since I hadnt figured out what I wanted this car to become. Everyone was pushing me towards RB, but I wasn’t so sure just yet. Cost was a major factor in all of this as well. I tend to like to be different than everyone else. Something original, something my own creation… So while I was on that task of figuring out what to use as its heart, I continued to tear down the car.
Click here for Part 3 – We dig into the suspension and brakes!
Questions about this build? Comments? Discussion here: Widebody 280Z discussion